Thursday, October 18, 2012

Drying Your Herbs

I've chatted on this subject before, but I find that it helps to repeat this as new folks who have never worked with herbs may not realize how simple it is to dry herbs for winter use.


Ways to dry:

  1. Hang Drying – this is ideal for any long-stemmed herbs, tarragon, lavender, sage, rosemary, mints, lemon balm, etc.

Take stems and bundle together, tying them or holding them with a rubber band.  Depending on the size of the stem 10 to 12 stems is a good size bundle.  Choose a hanging location that has good air circulation, minimal light, especially sunlight, and dust.  In my first home I suspended a rack from the ceiling in the basement, draped a white bed sheet over the top to collect the dust and had plenty of air circulation under and around the herbs.  The average drying time is 1 to 2 weeks.  In humid places, like Illinois, running a dehumidifier during the muggy months can help.

Once they are dry, and you know they are completely dry when they crumble in your hand, you can crumble them into jars for long-term storage.  Or you can leave them on the stem for longer storage by placing them stem and all in a zip lock bag.  Herbs left on the stem will keep their flavor several months longer than those crumbled and a year longer than those ground or powdered.

  1. Screen drying – smaller leaf or stem herbs, flowers and other petite plants are perfect for screen drying.

Place herbs on a window screen.  You can also use cheese cloth stretched over a frame or even lay them out on paper towel on corrugated cardboard.  What you want is good air circulation again and minimal sunlight.  The herbs will dry in a week or less, but you may need to turn them over depending on your air conditions. 

I purchased scratch and dent window screens from a build supply store all the same size and shape.  For this we then crafted a frame where the screens could slide in and out to make access easier once during loading and unloading.


  1. Oven drying – can be used for any herbs, but is best for those that do not do well with longer methods, especially Basil.  You do have to be careful with sage that has a very volatile oil.

Remove the fresh leaves from the stalk and place them on an oven tray.  You can layer the tray with parchment to make it easy to remove.  There are two ways to use the oven, the short method and the long method.  The short method you place the tray in a warm oven (350 to 400 degrees) for only 5 to 9 minutes until the herbs are dry and brittle.  Do not walk away and leave them or you can end up with scorched herbs.  If you have picked the herbs previously (up to 24 hours ahead) you can reduce the oven temp to 250 to 300 degrees. 

The long method is easier because you can set it and forget it.  With the long method you set the over to 350 degrees and allow it to pre-heat.  Then take the tray of herbs and set in the oven after you turn it off.  Leaving the oven door open to allow moisture to escape and allow a couple of hours or overnight for the herbs to dry.  If you have a gas oven with a pilot light, you can use this method without turning the oven on.  It may take 6 to 8 hours to dry the herbs this way.

  1. Refrigeration method – this is perfect for herbs with small leaves, thyme, rosemary, marjoram, or savory.

Place the small leaved herbs on a plate or a square of cardboard laid with paper towel and place in the refrigerator.  You can also do this with basil leaves but the paper towel is required.  You can also place the herbs inside of a paper bag, fold the tip closed and set them in the back of the refrigerator for a few days.  In both cases check them frequently and stir them around to avoid wilting and ensure even drying.  The drying time varies depending on the herb.  Thyme is much faster, while basil may take more time.  Once they are dry place them in containers.

The down side of this method is you need extra space in refrigerator and you can have flavor transfer.  Strong foods stored in the fridge may flavor the herbs and some foods may pick up the flavor of the herbs. My husband loves when I do this becasue I clean the refrigerator before I place the herbs.

Do you have a favorite drying technique?  Which one gives you the most success?  Leave a comment and let’s chat about it.

Tuesday, October 16, 2012

How Tuesday- Tortilla Bowls

I admit I am addicted to the Food Network.  But the cooking programs I love are really only on during the day and I am not home.  So when I am home alone on a Saturday morning, the first thing I do is turn on the Food Network.  While I do my laundry, catch up on blogs and make herb products, in the background are shows like Cooking like a Restaurant Chef, Pioneer Woman and Ina Garten or Giada.  I am not always watching every moment, but if they say the word “herb” they have my undivided attention.

The commercials recently have focused on this tool for making tortilla bowls.  I thought that was a great idea, but so limited and in my tiny kitchen if it does not multitask it is not allowed in.  Then one day on Pinterest I saw a photo of someone making these with the back side of a muffin tin.  Now that is what I needed.  Fun food -- No new kitchen tools! 

These are easy to make and fun to eay and not nearly as grerasy as a fried one at a restuant will be!
Here is what I figured out.

You need:
Tortillas
A muffin tin tray (an 18 or 12 cup pan would be better than a 6)
Cooking oil spray


Preheat the oven to 375 degrees.  Make sure the tortillas are at room temperature.  Cold tortillas do not form well.  

Spray the backs of the muffin tins with canola oil or spread canola oil with your fingers over the back of the tins.

Press a tortilla into the spaces between the upraised cups so that it forms a flower. 

Place the pan in the oven and bake for 8 minutes, checking after 6.

Once the tortilla is golden brown at the edges remove it from the oven. Allow to cool in the pan before you take it off and finish cooling on a towel.  The pan can be reused with out re-oiling to make a number of bowls.

Now you can fill it with salad topped with taco meat, salsa dip for an appetizer or a salad with seasoned chicken.

Here is what I made for my tortilla bowls:

Fiesta Seasoned Chicken Salad

1 lb. boneless chicken breast, sliced
1 T. oil
4 cups mixed salad greens
½ shredded cheese
1 cup salsa prepared with Backyard Patch Salsa Mix
Prepared tortilla bowls

Cook chicken slices in oil with Backyard Patch Fiesta Dip Mix on high for about 8 minutes or until cooked through.  Toss cooked chicken with salad greens, salsa, and cheese.  Stir in Ranch Dressing.  Spoon into tortilla bowls and serve immediately. Serves 6.

Saturday, October 13, 2012

Weekend Recipe - Fennel and Apple Slaw

This weekend's recipe can be used as part of adult fare for a Halloween get together.  The seasonal vegetables and herbs as well as the colors will lend itself to a Halloween themed party.

We are sharing other Halloween themed recipes all during the month, check out these posts we have already completed:


The licorice flavor of Fennel  adds a great tang to the seasonal apples.  You can make this one ahead so you are not crafting it at the last minute and it is easily doubled for a larger group.

Fennel, Apple and Celery Slaw

1 Tbls. cider vinegar
1 Tbls molasses
1 tsp. Dijon Mustard
1/2 tsp. salt
1/4 tsp. pepper
1/2 tsp. celery seed
1/4 cup olive oil
1 fennel bulb, trimmed cored and cut into very thin strips (I use a mandolin)
2 Granny Smith apples, cored and cut into strips
2 Gala Apples, cored and cut into strips
2 ribs of celery, thinly sliced

Whisk together the vinegar, molasses, mustard, salt pepper and celery seed in  a large bowl; slowly pour in oil, whisking constantly.  Add the cut up fennel, apples and celery to the dressing and toss to coat.  Cover and chill for up to 4 hours before serving.  Toss well be fore putting on the table.  Serves 8.


For those who prefer a more traditional slaw, this recipe with caraway has been very popular in my household!

Cool Caraway Coleslaw

2 cups green cabbage - shredded
1 cup red cabbage - shredded
1 cup carrots - peeled and shredded
1/2 cup mayonnaise
1 tablespoon rice vinegar
2 tablespoons granulated sugar
2 teaspoons caraway seeds
Use a food processor to shred the cabbage and carrots then add them to a large mixing bowl. In a small bowl mix together the remaining ingredients until all the sugar is dissolved to make the dressing. Pour the dressing over the shredded vegetables and mix together. Store the coleslaw in the refrigerator until ready to serve. Makes 4 cups of coleslaw.

Monday, October 8, 2012

Gifts for Dogs - Holiday Preparation

I decided that I needed to get a jump on my holiday planning as my teaching schedule has doubled this year leaving me much less free time.  As a result you get to reap the benefits.  Starting this week I will share a holiday recipe, gift idea, craft project,  or other relevant holiday themed idea at least once a week.  This will be in addition to the annual Advent Calendar which is chocked full of more recipes and crafty ideas.
Today I am starting with something for your dog.  I like to make dog biscuits and I found this recipe on the internet and fell in love with it.  Unfortunately I lost the citation in a resave accident so if anyone knows who originally posted this I would love to give them credit.

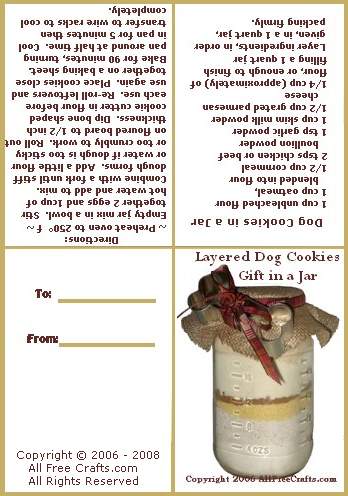
I liked this project because it can be a recipe or a gift to craft a recipe.  You can layer the items in a jar and present it as a gift with instructions or you can make the biscuits yourself and wrap those to be the gift.  It is simple and fun and your kids can help with it.


Layered Dog Cookie Jar Mix


Ingredients:
  • 1 cup unbleached or whole wheat flour
  • 1 cup of oatmeal, blended into flour
  • ½ cup cornmeal
  • 2 tsps beef or chicken bouillon granules
  • 1 tsp garlic powder
  • 1 cup skim milk powder
  • ½ cup grated Parmesan cheese (I used the grated Parmesan that is commercially made to sprinkle on pasta)
  • ¼ cup (approximately) of flour, or enough to fill a one quart jar
Directions:

Preheat oven to 250° Fahrenheit.

Empty jar mix into a bowl. Stir together two eggs and 1 cup of hot water and add to mix. Combine with a fork until a stiff dough forms. Add a little flour or water if dough is too sticky or too dry to work.

Roll out dough on floured board to ½ inch thickness. Dip cookie cutters in flour before cutting out each cookie. A bone shaped cutter is preferred, but any shape will do. Re-roll the leftovers and cut as many cookies as possible.

You can place cookies close together on a baking sheet as they will not spread while baking. Bake for about 90 minutes, or until cookies are dry and hard, turning pan around at half time to ensure even cooking. You can turn off the heat, but leave the cookies in the oven to dry out without further cooking if necessary. Dog cookies are usually baked until they are hard and crunchy. Let cool completely before storing in an airtight jar.

Jar Preparation

Use a funnel to layer ingredients, in the order given, in a one quart jar, packing each layer firmly with the back of a spoon.

Decorate the jar, I used brown muslin, but burlap will work well too.  The fabric is 6 inches in diameter held in place with a ball mason screw top.  You can also put the fabric over the jar lid to cover the band and hold it in place with ribbon, raffia or a rubber band.  Both give you a place to tie on the directions.
You can add a cookie cutter to the jar to make the gift a complete package.
I made a sample label.  You print it out and fold in the center to give you a cover and directions on opposite sides.  I like that you get three to a sheet of paper.

All of these ingredients keep well in a mason jar, so you can make the recipe way ahead and save them for holiday treats.

Happy Crafting!

Saturday, October 6, 2012

Herb-flavored Focaccia - Weekend recipe

Focaccia is a bread you can use to make sandwiches, or serve on the side with a salad.  I like robust and savory herb flavors with focaccia because then it can accompany anything from a salad to a soup or stew to roast beef.  This particular recipe makes a great bread for roast beef sandwiches.

This is a large recipe making 2 8 inch rounds that you bake in a cake pan to give you uniform size and depth.
 I like mine crispy, so I cover the surface with olive oil before I bake it.  If you want it softer, wait to put olive oil on the surface until after it is cooked, just after you remove it from the oven.

Herb-flavored Focaccia

2 1/2 tsp. (1 pkg.) dry active yeast
1 cup luke warm water (105 degrees F)
2 Tbls. olive oil
2 cups unbleached all-purpose flour (plus more for kneading)
1 tsp. salt
2 Tbls. fresh chopped chives or 1 1/2 Tbls. dried
1 Tbls. fresh chopped thyme or 1 tsp. dried
1 Tbls. fresh chopped summer or winter savory or 1 1/2 tsp. dried
1 1/2 tsp fresh rosemary, chopped fine or 1/2 tsp. dried crumbled
olive oil for surface

Directions:
In a large mixing bowl, stir the yeast into 1/4 cup of lukewarm water.  Let stand for 10 minutes until creamy, about 10 minutes.  Stir in the remaining 3/4 cup water and the olive oil.  Add 1 cup of the flour and the salt and whisk until smooth.  Add the herbs and mix well.  Then stir in the remaining 1 cup of flour 1/2 cup at a time until the dough becomes a rough mass (much like making scones only more dense.)

On a lightly floured work surface knead the dough until smooth and velvety.  About 8 to 10 minutes.  It will be soft.  Lightly oil a bowl and place the dough in it and turn the dough to coat with oil so it does not dry out.  Cover the bowl with plastic wrap and put in a warm place to rise until doubled in size.  Depending on temp this should take about 1 1/2 hours.

Divide the dough into 2 equal portions and knead briefly.  Oil two 8-inch round cake pans.  Place each portion of dough in the prepared pan and gently stretch it out to the edges, pulling it from the center outward to achieve an even thickness.  Cover the pans and set aside for 10 minutes to rest.  If needed continue to coax the bread out to an even thickness.  Cover with kitchen towels and let rise until almost doubled and very soft and puffy.  This will take about 45 minutes.

Preheat the oven to 475 degrees.  Dimple the dough with your fingertips in several places leaving indentations about 1/2 inch deep.  Cover the the pans and let rise for 20 more minutes.  Then drizzle or brush with olive oil and slip into the oven and bake until golden brown and cooked thorough, about 15 to 18 minutes.  Remove from pan.  Serve hot or at room temperature.  They will keep for 2 to 3 days if sealed in a plastic bag.

You can sprinkle the loafs with additional finely chopped fresh or dried herbs when you brush on the olive oil.


Thursday, October 4, 2012

Five ways to use Lavender in Your Home this fall

No other herb is quite so prized for its fragrance and beauty, or more evocative of romance than lavender.  The season for harvesting lavender has just passed and I have a number of screens full of dried buds.  
Lavender has a laundry list of good-for-you properties.  It is antiseptic, anti-bacterial, anti-fungal, anti-inflammatory, anti-convulsive, and anti-depressant. Lavender benefits stress, anxiety, exhaustion, irritability, headaches, migraines, insomnia, depression, colds, digestion, flatulence, upset stomach, liver and gallbladder problems, nervousness, and loss of appetite.  With this in mind, I glanced through just a few notes in my file drawer and came up with five great ways to put lavender to work for you.
Relaxing Lavender Bath
Make a strong infusion by adding a handful finely chopped lavender leaves and flowers to a cup of boiling water. Let it steep 10 minutes, strain and add to your bath.  Lavender will not only relax you with its scent but will reduce the stressful feelings with it essential components.
Drowsy Potpourri
Fill a bowl by your bedside with rose petals and dried lavender flowers. Add a drop or two of lavender essential oil. Finger the bowl before drifting to sleep.
Sleepy Sachets
Put lavender flowers and a few drops of essential oil in sachets to slip beneath pillow or inside the pillow case for a soothing release of scent if you wake or turn in the night. Or if you don’t have time pick up a few Lavender Sachets from the Backyard Patch to slip into Birthday cards and hostess gifts.


Lavender Moth BagsMix equal parts of the herbs from the following list. Place them inside muslin bags or if you are feeling especially crafty, sew squares of thin cotton or use heat seal tea bags to create sachets.  Lay them in with your blankets and towels or put them in between your clothes in the drawer.
Dried Herbs to use:
lavender flowers
lavender leaves
mint
rosemary
southernwood
santolina
marjoram
  
The Backyard Patch makes two different Moth Sachets as part of our Green Cleaning line and one has a recipe very similar to this one, using lavender to combat bugs in storage.

Lavender Room SprayAdd 5 drops lavender essential oil to 50 ml distilled water in an atomizer. You will need to shake the atomizer vigorously before each use. Do not make large quantities as the keeping time is relatively short.
Hope you enjoy this short list and remember to use your lavender for all the seasonal effects of shorter days and time changes.

Tuesday, October 2, 2012

How Tuesday - Purple Basil Jelly

It has been some years since I made jelly and I decided that I was putting it off because of my small kitchen and for jelly that was not really an issue.  To prove that to myself (and perhaps to you if you also have a small kitchen,) I made Purple Basil Jelly.  Last week before the temps went below 40 and took out the basil crop, I needed to rescue all those herbs.  Since I had to harvest every basil plant that left me with the surplus needed to make this recipe.  I did it in an evening after harvesting the plants so you do not even need to set aside a day or something to accomplish this.

I actually shared this recipe in the newest issue (November/December) of The Essential Herbal Magazine.  Now would be the time to order your subscription to get this and other seasonal end-of-year recipes as well as other articles for the herbal minded person!


The recipe follows all the pictured steps.


First I washed and air dried the harvested stems.  I laid them out on paper towel and turned them a couple of times while I got the other materials together and grated the lemon zest.

I measured the basil leaves into the measuring cup, pressing them down to make sure I had an entire 1 1/2 cups of leaves.  Then I placed the leaves in the empty saucepan and bruised them with my fingers. 


Adding the lemon zest, spices, 1 3/4 cups orange juice orange juice and 1/2 cup balsamic vinegar to the pan after the herbs were well bruised. 


Using a medium temperature, I brought he mixture to a boil slowly.


Once it was fully boiling I took it off the stove and poured the contents into a bowl, placed a cover over it and let it steep for 30 minutes.


After the mixture steeped I poured it into my jelly colander.  using the wooden plunger to press down the herbs and extract all the liquid.  You do not normally press down on the materials when making jelly as this will make the mixture cloudy, but the dark color and use of balsamic vinegar in this recipe means it will already be dark and cloudy so you might as well extract all you can from the herbs.


Once I had at least two cups of liquid I measured that back into a saucepan, added the 4 cups of sugar, one cup at a time and brought it to a full rolling boil.  You can see how just adding the sugar started to thicken the mixture and I had not yet added the pectin.

Once it was fully boiling and foaming I added the liquid pectin.  It comes in pre-measured pouches of 3 ounces so you need to make a recipe that crafts 4 to 6 pints to use this amount of pectin.


Bring the jelly back to a full boil so that it is rolling and foaming, then set your timer for one minute.  Stir constantly or the mixture will scorch.


Once you have allowed it to boil for 1 minutes remove it from heat and  skim off the foam that collects on top.  My mom always liked to eat this while it was still warm.


Once you have skimmed off the foam, pour the hot liquid into hot sterilized jars.  I generally leave the jars in the hot water I boiled them in until just before the jelly boils then I remove them from the how water and drain them on a towel.  By the time the pectin boils for one minute I can flip the jars over and fill them right away.  When I take the jars out of the hot water I slip the metal mason jar lids into the hot water and leave them in the water until I am ready to seal each jar with a lid.


The hot lids are placed on top of each filled jar and the rings are screwed on finger tight.  Then you place the jars in a water bath and boil for 5 minutes.  Normally you water bath for 10 minutes, but herbal jelly will get runny if you go that long so only boil covered for 5 minutes.  Then remove the jars to a heat protected surface and let cool.  The lids should pop fairly quickly.  Any that do not should be kept in the refrigerator and eaten first, the others will keep for 6 to 12 months or longer.


Notice my empty jar in the middle to keep the others from falling over into the empty space while boiling.


Recipe --


Purple Basil Jelly

1 1/2 cups packed purple basil leaves, washed and air dried
zest of 1 lemon
3 whole cloves
2 allspice berries
1 3/4 cups orange juice
1/2 cup balsamic vinegar
4 cups sugar
3 ounces of liquid pectin

Crush the basil leaves with your hands and place in a saucepan.  Add the lemon zest, cloves, allspice, orange juice and vinegar, then bring slowly to a boil.  Transfer to bowl and cover and let stand for at least 30 minutes.

Strain the mixture through a fine sieve pressing to extract all the juices. Measure 2 cups extracted liquid into a saucepan.  Add the sugar and bring to full rolling boil.  Stir in the pectin and boil for 1 minute.  Remove from heat, skim and pour into hot sterilized jars and seal.

Stop back in a week and I will have some recipes for using the Purple Basil Jelly.
Related Posts Plugin for WordPress, Blogger...