Showing posts with label harvesting herbs. Show all posts

Wednesday, September 7, 2022

Harvesting the herbs in the time of Virgo

I am a Virgo and this time of year I look up herbs for the Virgo to see what pops up on Google.  This year I found this great website with herbs and magick that is just so interesting.  I recommend taking a look.

The blog post was written by Alexis Cummingfolk and what I found as I searched around the site was a folksy conversation about herbs that was refreshing to read and wonderfully informative.

http://www.wortsandcunning.com/

What I loved about the post I found first, that caused me to want to look around more, was a list of seasonal reflections.  This list of questions caused me to pause and access, which I believe was the whole purpose.  I sometimes do not do that on a daily basis like I should and when I am coaxed to do so, I take it as a universal sign to get into alignment.

Here are the questions that she posted and here is the actual post I am referring too. 

Blog — Worts + Cunning Apothecary | Intersectional Herbalism + Magickal Arts (wortsandcunning.com)

http://www.wortsandcunning.com/blog?category=astroherbology

I have included my answers to the first question and I suggest you try this exercise for yourself…

What does the land feel like, look like, smell like this season?

What is coming to the surface from within me?

What is receding within me?

What am I feeling grateful for?

What am I grieving for or feeling challenged by?

What am I feeling inspired and where is it calling me to this season?

What am I calling to me?

What am I called to give?


What does the land feel like, look like, smell like this season?


I was out in the herb garden, so the wind was coming from the northeast across the forest preserve into the herb garden bringing with it the smell of water and trees that mingled with the scent of the herbs stimulated by the bright sun and the stiff breeze.  All the herbs are tall, at least those I have not yet cut, because of the recent rain they all had a growth spurt.

When I walk down the rows I brush my fingers over the herbs to release the scents and give my fingers a lovely perfume.  Harvesting is my favorite herb activity.  I get to touch the herbs, feel the softness or stiffness of the leaves and enjoy the buzz of the pollinators, who I do disturb with my cutting.  The heat in the drying shed is intense and I sweat a lot as I bundle and hang the herbs.  But the frequent and day-long sun means I can harvest even more in a couple days as the cut branches dry quickly.

The herbs wave in a natural and soothing way in the wind.  It looks like an undulating blanket when you gaze at the lemon balm clumps or the tall tarragon that flops over this time of year from its own weight.  The sage wiggles because the stiff woody stems don’t really bend much while the lavender waves back and forth allowing me to see the difference between lavender and rosemary because the rosemary tends to stand still in a breeze, while the softer stem of lavender moves like a dancer. From a distance, the long needle-shaped leaves look similar until there is a wind.

Lavender in flower

Lavender

Summer savory close up

Summer Savory

I harvested the annuals today because their life is short now and they want to make seed, so I cut them strongly.  The basil was at its licorice best today and the purple basil was especially pungent.  I know vinegar making is in my future. The holy basil crop is a bit sparse this year.  The earwigs enjoyed it more than any other herb in the garden. Then the soap mixture I sprayed it with caused the sun to fry the leaves that were not eaten. However, my thyme plants are very happy and the scent is strong even in the heat of the day which makes my nose sing.  I also harvested the summer savory.  It gets spindly this time of year, but the leaves are plentiful and the flavor is finally reaching its apex.  I chew on a branch of it to keep me from being thirsty. 

Lemon verbena stems wrapped in paper towel
Lemon Verbena

I finished my day by harvesting lemon verbena.  I cannot bring into the house all the plants I grow so this tender perennial will die away in the cold Illinois winter, but for now it’s heady with the scent of lemon and the leaves are large and bright green and asking to be stroked to release the fragrance, which I oblige.

Sunday, September 1, 2019

Final Harvest Season is Starting

I harvest herbs all year.  I judge a year by how soon I can take my first harvest.  This year it was not until mid May and that, to me, is late.  I lost at least two possible harvests in the spring.  Come mid summer I need to harvest regularly to get the plants more bushy and larger for improved and better harvests.
                               

By September I am doing what I call the final harvests.  Once the days get shorter I can no longer be as ruthless on my plants. During the height of the growing season I will cut between 2/3 and 3/4 of the height of a plant without fear that it will return with new growth.  That was evidenced by my harvest of lemon balm this year.  I kept cutting it back to 3 inches in height and I kept getting plants this big.
Lemon Balm, new growth after harvesting

Today I was harvesting Apple Mint to use in a program in a couple weeks at Schaumburg Library.  We will be using it in a tea blend.


My general rule with harvesting is cut the herbs, bundle the stems anywhere between 10 and 12 stems minimum and hang them.  I don't do anything special except line up the bases of the stems and wrap with a rubber band.

However, when harvesting mint, especially a large leaf mint like apple mint, I change my technique just a bit. Here is the Apple Mint haul.


The plants are large 3 to 4 feet tall, the leaves can get 2 to 3 inches in length and are thick and filled with moisture. Yes, I do say cut your herbs before they flower, but that rule never applies to Mint.  If the flowering is reducing the flavor or scent, I can't tell which means I can let these mature undisturbed until I am ready to harvest.

I cut the branches about 1 foot from the ground and stack them on a table out of direct sun to wilt for a while.  An hour or two depending on how busy I am.  The wilting gives me a better feel for how thick and large the stems are before I bundle them.  I want them to dry quickly so a smaller bundle is preferred.

With mints the leaves have a lot of moisture as do the larger square stems.  As a result I do two things while prepping the mints to dry.  I strip off the leaves at the base of the stem.


And I only use 6 to 8 stems, never the 10 to 12 average I use with other herbs.

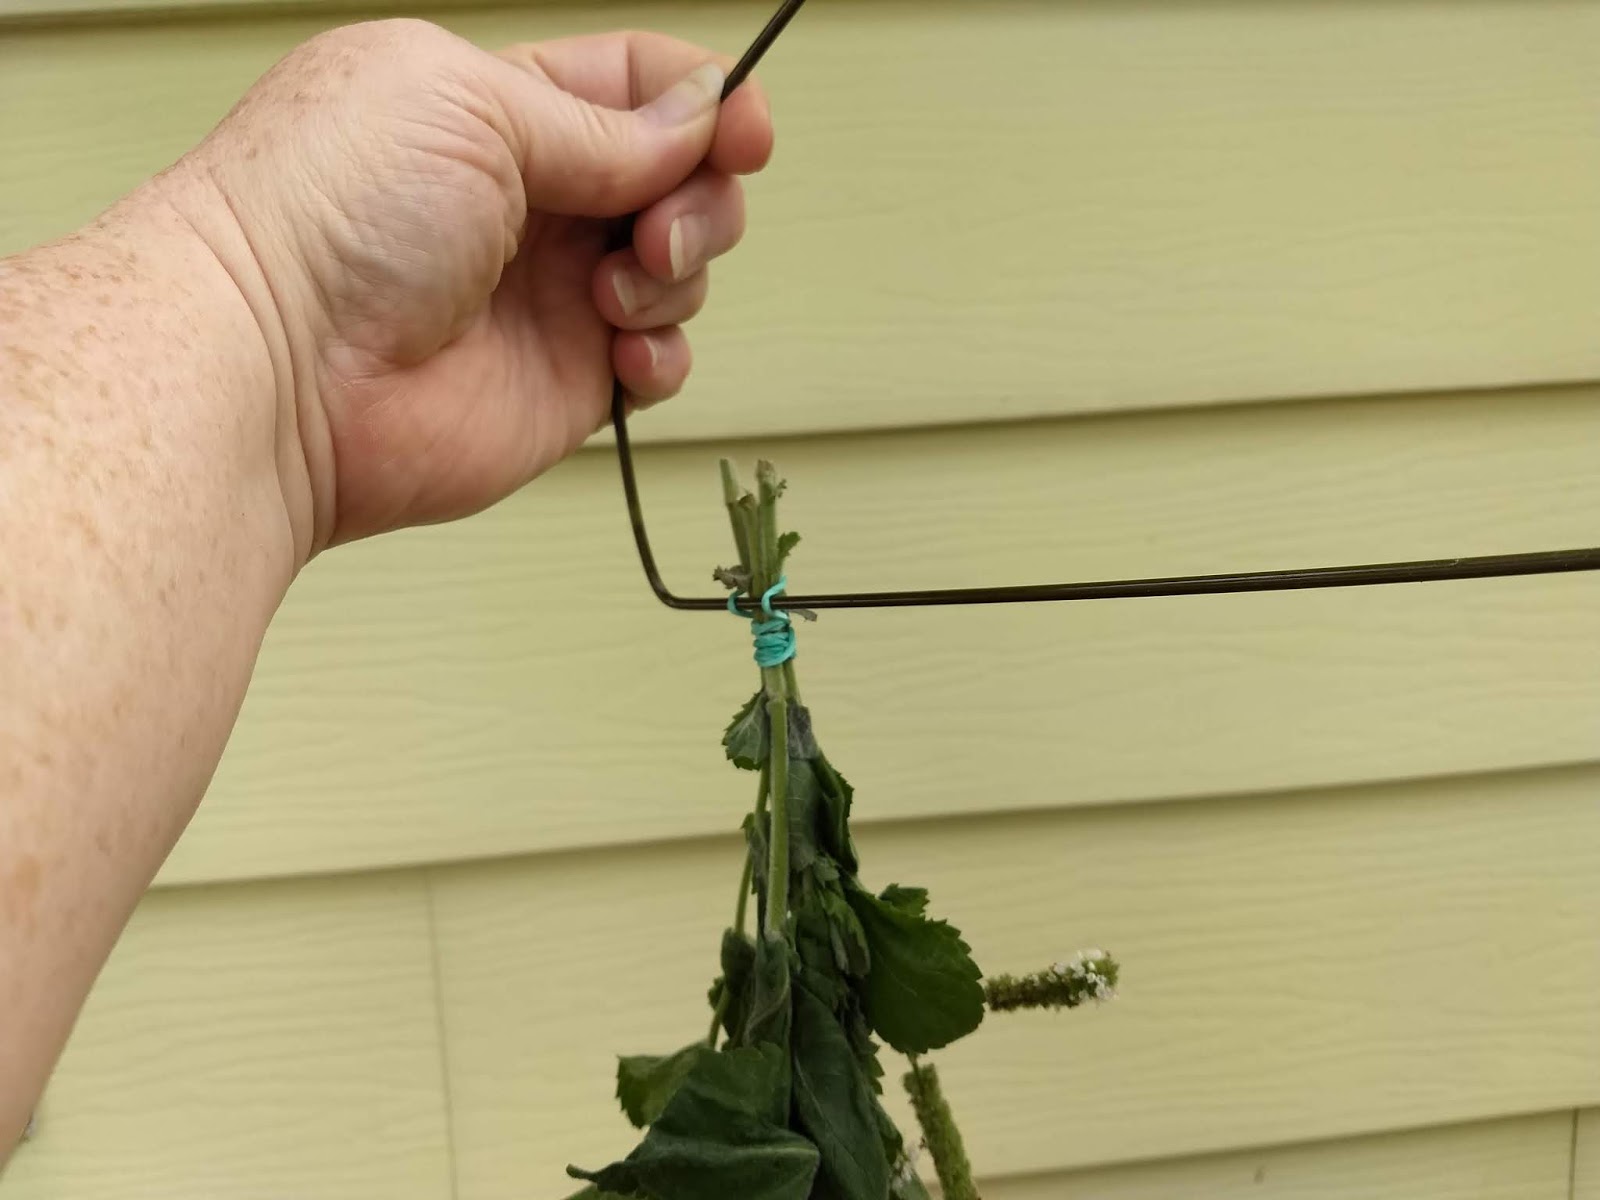
I bundle them with a rubber band.  Sure you can use string, but as the stems shrink in drying, the herbs will fall and I dislike cleaning up that mess.


Then stretch the band over the arm of a hanger and suspend the herbs.  In my herb drying shed I use the same technique over dowel rod arms on a large frame where the dowels are 12 inches apart.


Sometimes I dry on two racks hung over one another, but with a bundle as long as this I only dry on one rack.

The time it takes for the herbs to dry varies depending on heat and humidity.  Right now humidity is low, but temps are cool, so the drying time I expect to be 2 weeks.  Just in time for the program on September 12.

I saved the leaves I stripped off and stems.


Then sorted through them.  Those that were in good shape, I saved and laid out on a paper towel on the kitchen counter.  I do this often and have a small collection of drying leaves most days.  You can lay them very close together, because in a couple days they will shrink leaving plenty of space between the leaves.

Dried branches of lemon balm show what I mean.

Once the herbs are dry, they should be stored in a glass jar so they do not re-absorb water from the environment.  You know they are completely dry when they crumble easily in your hand when you scrunch the tips of the leaves.


Wednesday, March 9, 2016

Beginner’s Guide to Growing Basil

Almost everyone loves to eat fresh basil and some people have a hard time growing it.  Basil can be a finicky little plant in the changeable weather that is Spring.  Don’t let the Basil get the better of you with these simple tips.

If you are planning your Spring garden, here is a Beginner’s Guide to Growing Basil to help you out.
SEEDS OR TRANSPLANTS
Beginners, don’t even think about growing basil from seed. If you do, just wait for the frustration to come out after two weeks. You will be SO excited to see the little guys sprout up and then you will wait, and wait, and wait for them to grow bigger. You will keep waiting. It won’t happen. Basil seeds are susceptible to a fungus on the soil that stunts their growth. It is due to poor air circulation and not keeping the soil’s water level maintained. If you are experienced with starting plants from seed you will be okay, but if you are new, just go over to the nursery or local plant sale and pick out 1-2 basil plants in different varieties. Unless you plan on freezing and drying basil, a 6-pack of basil will produce too much.

Lemon Basil
VARIETIES
Purple basils have a smaller more compact habit and take up less space, yet taste the same as sweet basil, so try them if your space is limited.  Lemon basil has a distinctive flavor and many uses in cooking.  If you have never tried it, you should take the plunge.  Sweet basil comes in many varieties.  If pesto is your aim try Genovese or Napaletano. For those wanting to try a basil tea, cinnamon, tulsi (holy,) or thai basil have unique flavors that are great for food or beverages.
Purple Basil

ADVICE AND INFO
Basil is a heat lover and a cold hater.  Make sure your plants are hardened off before you leave them out overnight.  This means introducing them to the outdoors one hour or two a day for about a week then moving up the time until they stay out an entire day.  Keep them shaded for that transition period.  Once they are ready to stay outside, you still need to protect them (I bring them back indoors) if the temps dip into the 40s (Fahrenheit) at night.  The leaves will turn black if they get too cold and this can kill a young seedling. 
Basil is a heavy nutrient user. If growing them in a container, you will need at least a one gallon container for them to spread out in and you will need to feed them every month. When growing in the ground you may still need to feed them.
Since basil plants produce edible leaves, they need more nitrogen, making blood meal the perfect soil amendment (this is available at your local home and garden center.) Basil also needs a lot of water. It can handle the soil drying out in between waterings, but it really likes to be moist if possible. Basil is also a sun worshipper – give your plant at least 6-8 hours of bright sunlight a day.
http://ir-na.amazon-adsystem.com/e/ir?t=monetokn-200&l=as2&o=1&a=B001JTAJFM
HARVESTING AND USING
Harvested Basil

You can start to harvest basil as early as 3-4 weeks after it has been able to stay out overnight, or once the plant is taller than six inches. Gently pinch all the way down the stem to the union of the next leaf set. You want to remove that stem so that new leaves will grow from that point. Pinch off as much as you need at the time or harvest full stems for freezing and drying. 
Pinching out the center above two branching leaves.
Always remove the flowers the minute that they emerge, especially in the early season. If you don’t, the leaves diminish in size and flavor as the plant sends energy to make seed.

Flowering Sweet Basil
Once the weather man predicts an overnight temp less than 45 degrees F, cut down the last of your basil and dry it or preserve it for winter use. I have several posts on making pastes and pesto with basil, that you can check out once you have enough harvest. 
Most important harvest your basil often.  If you just let it grow, you will not get a bushy plant but a single stalk that will flower early and get top heavy, so pinch and enjoy your basil as soon as it is ready!
Holy (Tulsi) Basil

Thursday, September 24, 2015

Back in the groove - Herbs for Fall

We have finally finished moving.  I have the internet at home now for the first time in over a decade. And it is a good thing, because I am not working outside the home as much as before.  I am going to be spending my time growing the herb business!  Something I have wanted to do, but have not had the hours needed for such a long time.

Harvest was good this year, as water has been plentiful and flooding not an issue for a change. Here a a few shots of the inside and outside of the new shed.  Now I have two sheds.  One at the property and one at home so I can harvest twice as much on a work day.  This will be good int he long run because the more you harvest the more grows back!!


Since it is harvesting season, I thought I would share a few harvesting and preserving links from posts past as I gear back up to posting more regularly.

Happy harvesting!

Here is a post on Drying the Harvest

This one is an overview of of the technique of hang drying.

This one details how to make herb pastes - the best way to preserve the fresh basil flavor.

Of you can just Freeze the herbs too!

Monday, August 18, 2014

Preserving Herbs - A collection of posts

It is that time of year when i need to discuss preserving herbs.  I do this about this time of year every year.  The herbs are getting full and bushy and now is the time to take some and preserve them for the winter.

There are many ways to preserve the fresh flavor of herbs.  We just harvested the small herb patch we have in our community garden this week (and wrote about it if you want a quick overview.)

General Posts on Preservation


Drying Herbs
I have talked about various methods for drying herbs for years.  Here are my best posts on the subject:


     Air Drying Herbs

     General Drying Methods

     How to Dry Your Harvest  

     Drying Herbs in the Microwave

   
Freezing Herbs

    Herbal Seasoning Ice Cubes

    Freezing Herbs


Preserving in Vinegar or Wine

     Making Herbed Wine

     How to make herb vinegar

     Making tarragon vinegar

     Making Pesto

     Using herbal vinegar


Tuesday, October 1, 2013

Preserving the Harvest - How to Make Herbal Seasoning Frozen Cubes

I've talked before about freezing as a method of preservation for herbs and I have discussed making herbal pastes. This time I am going to combine the two and show you how to make an herbal paste and freeze it.

I harvested these herbs for a program that was cancelled so I needed to use them up in a hurry.  We could not cook them all so I decided that I would make an herbal paste and try a new technique someone turned me onto this summer.

These frozen nodules of goodness are great in seasonal soups, stews, gravy and sauces. And because they are the size of an ice cube, you do not have to thaw an entire jar of puree making the herbs easier to use in cooking especially when pressed for time.

How to make frozen herbal seasoning cubes

1) First off, harvest your herbs that you want to freeze and give them a cleaning and air dry to remove the wash water.


2) Next, pulse the herbs in a food processor or blender with enough broth, olive oil or water to get your desired consistency. Use just enough liquid to blend the herbs together well. It was close to 1 teaspoon or two, not a full tablespoon for this average size Osterizer.


  •   for basil use olive oil (I used purple basil)
  •   for thyme you can use broth or water.  I made some with chicken broth and some with water
  •   for sage a lighter oil like canola is good or chicken broth if you intend to use it in stuffing
  •   for tarragon or dill I suggest water because you do not want to mask the light flavor
  •   for garlic or garlic chives use a bit of olive oil (If you love garlic but hate mincing fresh, this is the way to go.)

3) Prepare your trays or muffin tins. They should be clean and dry.  I experimented with spraying cooking oil in some of them.  I do not think it make much difference in the removal stage.  One friend suggested placing a fresh leaf in the bottom of the tray to make an imprint in the cube.  It makes them very pretty and I felt like Martha Stewart doing it - which is a good thing!


4) Plop spoonfuls of your mixtures into the cleaned ice cube trays or mini muffin pan or other suitable containers and freeze. Be sure to mark the trays with what you placed in them because except for the purple basil, they all look alike as a puree.  Allow them to freeze at least overnight, 12 hours is better than 8.


5) When they have frozen solid, pop them out and store them in a zip lock bag in the freezer.  These will keep for quite a while.  My friend said she had some from 2 years ago that she was still using and the flavors were just fine. 
frozen cubes in ziplocks in a freezer bag


I also experimented with blending a few of the herbs together in the cubes too. 
thyme & tarragon frozen

   
Thyme & Basil before freezing

When you use the herbal cubes, just take one (or two) out and toss in whatever you are cooking. It will melt down fast and incorporate its flavorful goodness into your dish. With this technique you save some sweet summer for your winter dishes.

Tuesday, August 13, 2013

Harvest time How Tuesday- Air Drying Herbs

Herbs are tremendously useful in so many ways. So it is late summer now, your herb garden has been planted, watered, weeded, and you’ve watched the plants grow and thrive. Now it’s time to learn how to use those wonderful herbs and it requires only a little bit of work. The first step in using the results of your garden is to harvest them.

Harvesting an herb does not mean removing the entire plant, rather cutting or rimming 2/3 to 3/4 of the plants height. An herb’s essential oils can be dispersed by the wind and the heat, and on extremely wet days, fewer oils are produced by the plants. The best time to harvest your herbs is during mid to late summer, on a calm and dry morning. Harvest them right before the flowers open in the morning and just after the dew has dried from the leaves.  Yes i did say 2/3 to 3/4 they will grow back, I promise and they will be happier if you cut them often instead of waiting until October.


Using fresh herbs right out of your garden is a delight. Make sure to clean the herbs before using them fresh in recipes. To clean fresh herbs, fill a bowl with cool water and place the herbs in the bowl. For a larger quantity, use the cleaned kitchen sink. Add about two tablespoons of salt to the water. Any insects present on the herbs will be driven away by the salt in the water, without damaging the plant. Rinse carefully and allow them to air dry.  You can speed up this drying by  placing the herbs in a salad spinner.

Of course, herbs don’t have to be used at the time they are picked. They can be preserved for later use in three ways by: drying, freezing, or preserving them in salt, butter or vinegar.


I have posted ways to make and use butters and vinegar before, so I will let you look at those posts:


http://backyardpatch.blogspot.com/2011/09/how-tues-day-making-herbal-vinegar.html

http://backyardpatch.blogspot.com/2011/08/compound-herb-butters-summers-special.html


I will talk about some other drying methods in the coming weeks as well, but I thought I would start with the easiest -- air drying.  And I have some great photos from this year’s harvesting. This is a very simple way to preserve herbs. It works best with sturdy herbs like sage, lavender, thyme, savory, mints, rosemary and oregano.

Pick herbs in the morning, after dew has dried, but before the heat of the day sets in. Rinse them and pat them dry. Then, try one of these air-drying methods, all of which take about two to three weeks:

  • Remove leaves from the bottom of the stem, and bunch four to six stems together loosely. Bundle with a rubber band or string and hang them, upside down, out of direct sunlight for two to three weeks.
  • Spread the herbs out on a loosely on a window screen or woven basket tray and dry them flat.

  • Put herbs into brown paper bags and loosely tie or fold over the top.  This is especially good for thyme and chives.
When the herbs crumble to the touch, you can pack the leaves into jars or seal them in plastic bags. Be careful not to crush them yet. Store them whole so that they’ll keep more of their flavorful oils. Keep them from direct sunlight so they’ll maintain their flavor for several months.

Steps to air drying:

Trim the stems until all the herbs in a bundle are about the same length. Place 4 to 6 stems together and bundle with a rubber band.  Some people like string, but since the stems shrink during the drying process, I am more fond of rubber bands which will contract and keep the herbs off the floor.


fresh savory and sage ready to be hung

I also like the fact that the last loop of the band can be placed over the hanging bar and back over the stems to serve as a hanger.  And when I want to remove the herbs.  I just tug on the bundle and the rubber band snaps off the hanging rod.
 
Rubber band looped over rod
 Place the herbs in a dry dark area out of direct sunlight. and give them 48 hours to two weeks to dry.
Quick and easy drying rack using paper tube wire hangers

Once the herbs pass the "crumble test," they are done and can be stored until you are ready to use them in a sealed jar or container.  I place bundles whole in glass jars or zip seal bags until i am ready to strip the stems into my still room jars for use in blends.
 
Savory crumbling perfectly

Sage perfectly dry
When I dry sage, I like the use the leaves with the best color to make rubbed sage.  So I will sort through the leave and separate out the leaves I like.  I crumble them in my hand to a coarse consistency.

Then I place them on a paper towel and using the balls of my fingers rub in gentle circles until I create a clumping powder.  


There are those who run sage leaves in a blender or grinder to make rubbed sage, but I think this lets too much essential oil escape and I prefer the hand method.  It does not take any longer and you have no extra cleanup!
rubbed sage ready for bottling

Related Posts Plugin for WordPress, Blogger...