Showing posts with label drying. Show all posts

Sunday, September 1, 2019

Final Harvest Season is Starting

I harvest herbs all year.  I judge a year by how soon I can take my first harvest.  This year it was not until mid May and that, to me, is late.  I lost at least two possible harvests in the spring.  Come mid summer I need to harvest regularly to get the plants more bushy and larger for improved and better harvests.
                               

By September I am doing what I call the final harvests.  Once the days get shorter I can no longer be as ruthless on my plants. During the height of the growing season I will cut between 2/3 and 3/4 of the height of a plant without fear that it will return with new growth.  That was evidenced by my harvest of lemon balm this year.  I kept cutting it back to 3 inches in height and I kept getting plants this big.
Lemon Balm, new growth after harvesting

Today I was harvesting Apple Mint to use in a program in a couple weeks at Schaumburg Library.  We will be using it in a tea blend.


My general rule with harvesting is cut the herbs, bundle the stems anywhere between 10 and 12 stems minimum and hang them.  I don't do anything special except line up the bases of the stems and wrap with a rubber band.

However, when harvesting mint, especially a large leaf mint like apple mint, I change my technique just a bit. Here is the Apple Mint haul.


The plants are large 3 to 4 feet tall, the leaves can get 2 to 3 inches in length and are thick and filled with moisture. Yes, I do say cut your herbs before they flower, but that rule never applies to Mint.  If the flowering is reducing the flavor or scent, I can't tell which means I can let these mature undisturbed until I am ready to harvest.

I cut the branches about 1 foot from the ground and stack them on a table out of direct sun to wilt for a while.  An hour or two depending on how busy I am.  The wilting gives me a better feel for how thick and large the stems are before I bundle them.  I want them to dry quickly so a smaller bundle is preferred.

With mints the leaves have a lot of moisture as do the larger square stems.  As a result I do two things while prepping the mints to dry.  I strip off the leaves at the base of the stem.


And I only use 6 to 8 stems, never the 10 to 12 average I use with other herbs.

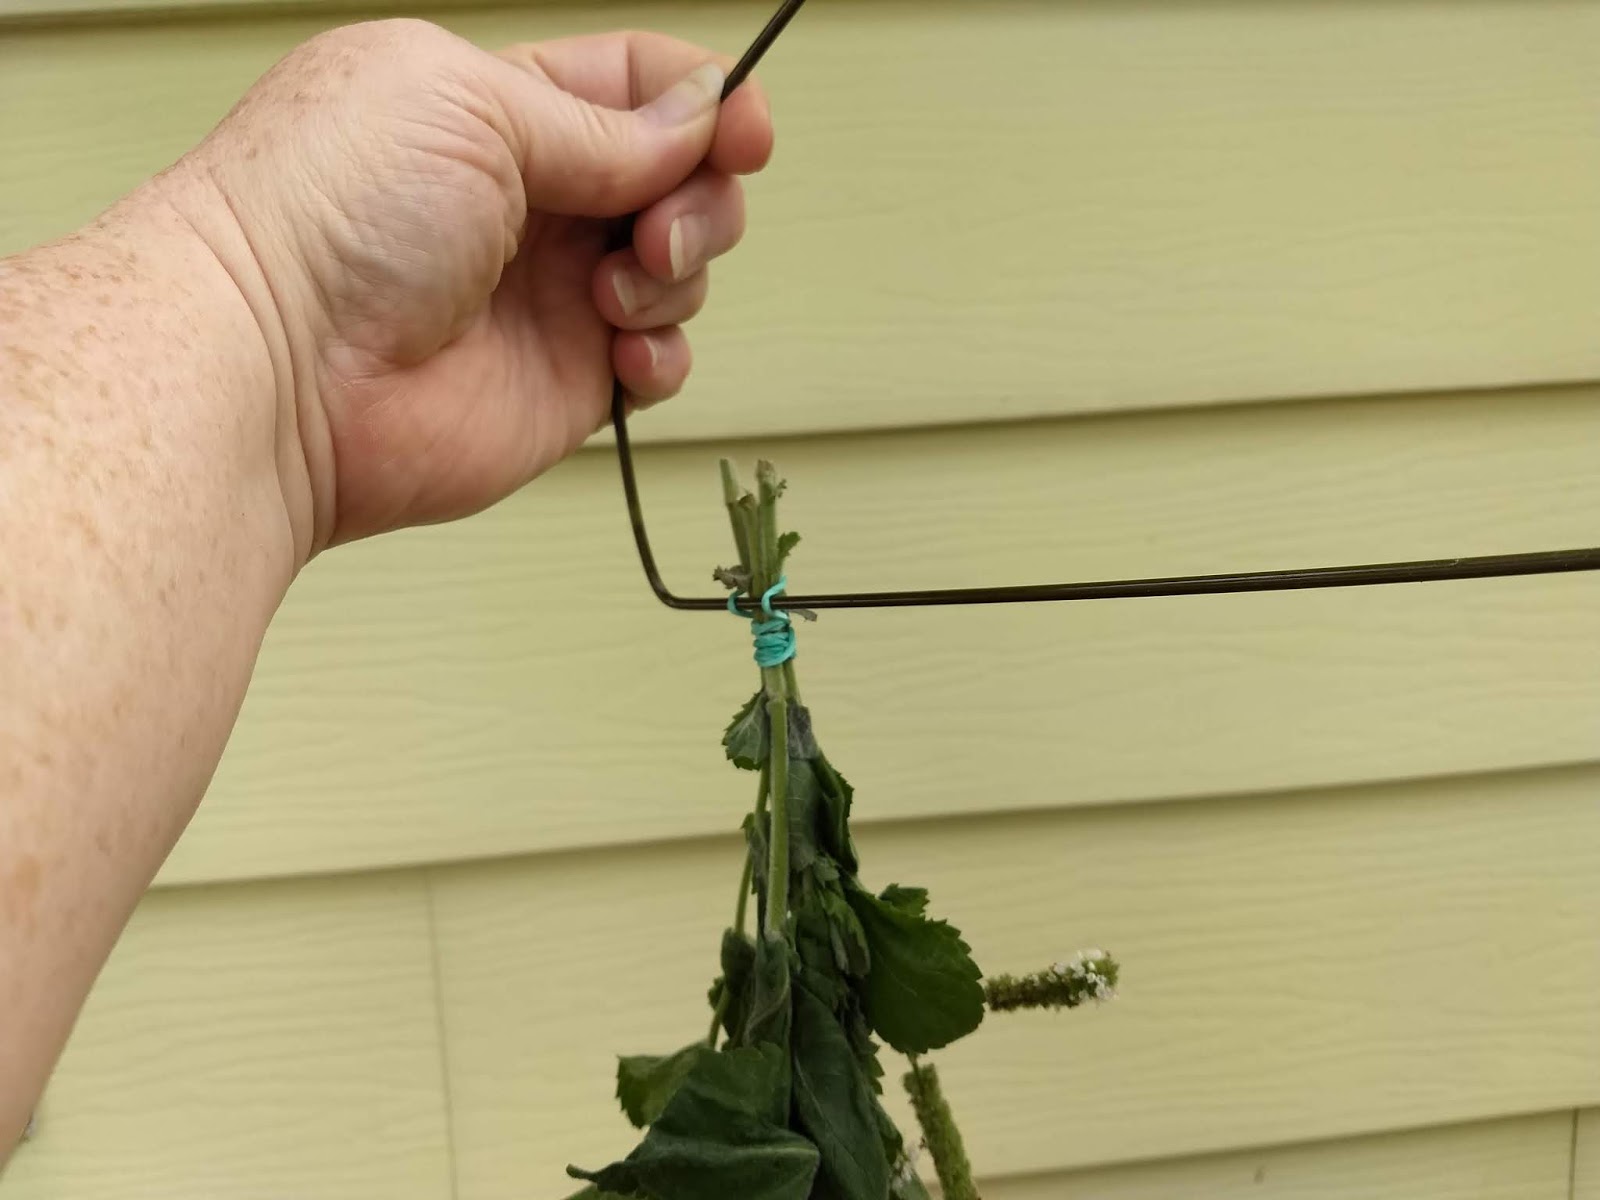
I bundle them with a rubber band.  Sure you can use string, but as the stems shrink in drying, the herbs will fall and I dislike cleaning up that mess.


Then stretch the band over the arm of a hanger and suspend the herbs.  In my herb drying shed I use the same technique over dowel rod arms on a large frame where the dowels are 12 inches apart.


Sometimes I dry on two racks hung over one another, but with a bundle as long as this I only dry on one rack.

The time it takes for the herbs to dry varies depending on heat and humidity.  Right now humidity is low, but temps are cool, so the drying time I expect to be 2 weeks.  Just in time for the program on September 12.

I saved the leaves I stripped off and stems.


Then sorted through them.  Those that were in good shape, I saved and laid out on a paper towel on the kitchen counter.  I do this often and have a small collection of drying leaves most days.  You can lay them very close together, because in a couple days they will shrink leaving plenty of space between the leaves.

Dried branches of lemon balm show what I mean.

Once the herbs are dry, they should be stored in a glass jar so they do not re-absorb water from the environment.  You know they are completely dry when they crumble easily in your hand when you scrunch the tips of the leaves.


Tuesday, September 12, 2017

6 Unique Ways to Preserve an Herb Harvest

There are many ways to preserve the herbs from your harvest.  Here are a few quick and easy ones to get you started.

Freeze leaves in water

Quick and easy, you just grab an ice tray fill the square halfway with water and add the herb leaves.  You can leave the leaf whole or chopped them fine.  Pop them into the freezer.  Once the cubes are frozen fill the tray the rest of the way with water and freeze again.  This two-step method makes sure the leaves stay covered by the water and ice so they keep their green color.

Once finally frozen you can pop put the cubes and place them in a zip lock bag for long term storage.  This will give you herbs for casseroles, soups, stews and long cook dishes all winter.  Discard the cubes once the spring harvesting begins.

Make a Bouquet Garni Bundle 

Bouquet garni is a bundle of herbs (thyme, bay, parsley, rosemary, savory) used in long cook soups and stews.  It is great in the crock pot where you can hang the bundle from the side and let the flavor infuse the dish, then remove the bundle when cooking is over.  You do not have to worry about leaves in the dish or picking out bay leaf.

You can use a bouquet garni fresh, or you can make fresh bundles and hang them to dry.  Once dry, you can wrap a cello bag around them and give them as a gift along with a soup recipe, or save their wonderful goodness all for yourself.

I have previously posted recipes to use with bouquet garni too!

Dry in a paper bag

Savory, Thyme and rosemary are all great candidates for bag drying.  The leaves have a small size and very little moisture, so you toss the cut stems in a bag, hang it on the wall and let the herbs dry.  Sometimes depending on humidity, I will give the bags a shake every few days. No other special treatment is needed and the herbs will be try enough to be stripped from the stems for storage in about a week.


Honey or Vinegar Infusion


Make an infusion of herbs transferring the flavor into another medium.  You can create a vinegar or honey.  See these posts for detailed instructions.

How Tuesday on making vinegar

Recipes using Herbed Vinegar


Make a compound butter
A compound butter is any plain unsalted butter to which you add herbs. You can create a single herb flavor or blend the herbs tighter to create a variety of flavors.  The general rule is 1/8 to 1/4 cup herbs into 1 stick unsalted butter.

Here is one of my favorite versions:
1 tsp parsley, finely chopped
1 tsp thyme leaves
1 tsp chopped chives or garlic chives
1 tsp tarragon

Blend the herbs into 1 stick of room temperature unsalted butter with a fork to get the herbs evenly distributed.  Then roll the soft butter into a sausage in plastic wrap and place in the refrigerator to eat in a week or in the freezer for up to 3 months.  You can use the butter on fresh steamed vegetables, steaks, baked or roasted potatoes, rice, egg noodles are on your morning toast of muffins.

I have more recipes for making compound butter (also called Herb Butter) all over the blog, but here is one of my first. 

Make a salt

There are several ways to make herb salt.  My two favorites are just to layer the whole herb leaf in salt and allow the salt to absorb the flavor from the leaf then later remove the leaf and you have white salt infused with flavor.  Another way is to run the salt and herbs in a coffee grinder.  I start with a larger salt so that I get a fine salt with fine flakes of herbs in it. 


You can also make an herb salt with chopped fresh leaves that you stir into salt, then spread on a baking sheet and allow to dry in the open air for 2 to 3 days to a week depending on humidity.  This is a great way to infuse the salt with a mixture of herbs, like a blend of chives, thyme, parsley and sage.  You use about 1 teaspoon of chopped fresh herbs to ¼ cup of salt (I like kosher.)  Once the herbs and salt have dried, you can place the mixture in a jar where it will keep its herbal taste for at least a year.

We will be posting more ways to make herbed salt and flavored sugar later this fall.

Thursday, September 24, 2015

Back in the groove - Herbs for Fall

We have finally finished moving.  I have the internet at home now for the first time in over a decade. And it is a good thing, because I am not working outside the home as much as before.  I am going to be spending my time growing the herb business!  Something I have wanted to do, but have not had the hours needed for such a long time.

Harvest was good this year, as water has been plentiful and flooding not an issue for a change. Here a a few shots of the inside and outside of the new shed.  Now I have two sheds.  One at the property and one at home so I can harvest twice as much on a work day.  This will be good int he long run because the more you harvest the more grows back!!


Since it is harvesting season, I thought I would share a few harvesting and preserving links from posts past as I gear back up to posting more regularly.

Happy harvesting!

Here is a post on Drying the Harvest

This one is an overview of of the technique of hang drying.

This one details how to make herb pastes - the best way to preserve the fresh basil flavor.

Of you can just Freeze the herbs too!

Thursday, September 25, 2014

The Scent of Herbs

This year I had a community garden where it became obvious that I am really good at growing herbs, but perhaps not so great at vegetables.  I put a small edging of herbs along the front of the 20’ x 20’ garden which prospered in this odd season of no hot weather and too much rain.


At my regular herb garden I have a special shed with a black roof to speed drying.  But I was not going to transport the herbs from the garden in Elmhurst to the herb garden 7 miles to the north, so I filled the gathering basket and took the herbs to the apartment.  I had forgotten in the years we lived in this apartment what it smelled like to have fresh herbs drying inside. 


I have bundled the herbs, and hung them on hangers, spread them on paper towel lined plates on my riser and spread them on cooking sheets. It has kinda taken over the dining room, but since we never eat in the dining room this was not much of a big deal.  

And the smell it is really wonderous.  The mixture of lemon and mint and thyme and basil and oregano is a heady combination.  Sometimes it makes me hungry.  Other times it just makes me relax.

They say that the scent of herbs is very healing. 


Mint and lemon balm are laid out on paper towel on my cookie baking sheets.  You can see the paper bags which hold the thyme.  This is the best way to dry thyme.  It takes only a couple of days and you can then strip it into the bag and pour into a jar.  It sure beats trying to bundle those tiny stems.  I have always tossed cut thyme into a bag, in the shed I binder clip the bags to the edges of the building interior.


The mint, lemon balm, fennel, dill, oregano and basil all hang from the hangers.  In a couple of days I can pull of the crisp dry bundles and toss them into a storage bag.

The healing power of the scents could account for the fact that Hubby’s fall allergies (and accompanying snoring) have been almost non-existent.  And my insomnia is easily cured by sleeping on the couch, which is right next to the dining room.

So if you have herbs that have flourished this year, cut them and hang them in your home, not only will you enjoy the healing power of the scents, you will be carrying on an ages old tradition of wise herb growing women for the last thousand years who know that herbs are good for us!


Monday, August 18, 2014

Preserving Herbs - A collection of posts

It is that time of year when i need to discuss preserving herbs.  I do this about this time of year every year.  The herbs are getting full and bushy and now is the time to take some and preserve them for the winter.

There are many ways to preserve the fresh flavor of herbs.  We just harvested the small herb patch we have in our community garden this week (and wrote about it if you want a quick overview.)

General Posts on Preservation


Drying Herbs
I have talked about various methods for drying herbs for years.  Here are my best posts on the subject:


     Air Drying Herbs

     General Drying Methods

     How to Dry Your Harvest  

     Drying Herbs in the Microwave

   
Freezing Herbs

    Herbal Seasoning Ice Cubes

    Freezing Herbs


Preserving in Vinegar or Wine

     Making Herbed Wine

     How to make herb vinegar

     Making tarragon vinegar

     Making Pesto

     Using herbal vinegar


Tuesday, August 13, 2013

Harvest time How Tuesday- Air Drying Herbs

Herbs are tremendously useful in so many ways. So it is late summer now, your herb garden has been planted, watered, weeded, and you’ve watched the plants grow and thrive. Now it’s time to learn how to use those wonderful herbs and it requires only a little bit of work. The first step in using the results of your garden is to harvest them.

Harvesting an herb does not mean removing the entire plant, rather cutting or rimming 2/3 to 3/4 of the plants height. An herb’s essential oils can be dispersed by the wind and the heat, and on extremely wet days, fewer oils are produced by the plants. The best time to harvest your herbs is during mid to late summer, on a calm and dry morning. Harvest them right before the flowers open in the morning and just after the dew has dried from the leaves.  Yes i did say 2/3 to 3/4 they will grow back, I promise and they will be happier if you cut them often instead of waiting until October.


Using fresh herbs right out of your garden is a delight. Make sure to clean the herbs before using them fresh in recipes. To clean fresh herbs, fill a bowl with cool water and place the herbs in the bowl. For a larger quantity, use the cleaned kitchen sink. Add about two tablespoons of salt to the water. Any insects present on the herbs will be driven away by the salt in the water, without damaging the plant. Rinse carefully and allow them to air dry.  You can speed up this drying by  placing the herbs in a salad spinner.

Of course, herbs don’t have to be used at the time they are picked. They can be preserved for later use in three ways by: drying, freezing, or preserving them in salt, butter or vinegar.


I have posted ways to make and use butters and vinegar before, so I will let you look at those posts:


http://backyardpatch.blogspot.com/2011/09/how-tues-day-making-herbal-vinegar.html

http://backyardpatch.blogspot.com/2011/08/compound-herb-butters-summers-special.html


I will talk about some other drying methods in the coming weeks as well, but I thought I would start with the easiest -- air drying.  And I have some great photos from this year’s harvesting. This is a very simple way to preserve herbs. It works best with sturdy herbs like sage, lavender, thyme, savory, mints, rosemary and oregano.

Pick herbs in the morning, after dew has dried, but before the heat of the day sets in. Rinse them and pat them dry. Then, try one of these air-drying methods, all of which take about two to three weeks:

  • Remove leaves from the bottom of the stem, and bunch four to six stems together loosely. Bundle with a rubber band or string and hang them, upside down, out of direct sunlight for two to three weeks.
  • Spread the herbs out on a loosely on a window screen or woven basket tray and dry them flat.

  • Put herbs into brown paper bags and loosely tie or fold over the top.  This is especially good for thyme and chives.
When the herbs crumble to the touch, you can pack the leaves into jars or seal them in plastic bags. Be careful not to crush them yet. Store them whole so that they’ll keep more of their flavorful oils. Keep them from direct sunlight so they’ll maintain their flavor for several months.

Steps to air drying:

Trim the stems until all the herbs in a bundle are about the same length. Place 4 to 6 stems together and bundle with a rubber band.  Some people like string, but since the stems shrink during the drying process, I am more fond of rubber bands which will contract and keep the herbs off the floor.


fresh savory and sage ready to be hung

I also like the fact that the last loop of the band can be placed over the hanging bar and back over the stems to serve as a hanger.  And when I want to remove the herbs.  I just tug on the bundle and the rubber band snaps off the hanging rod.
 
Rubber band looped over rod
 Place the herbs in a dry dark area out of direct sunlight. and give them 48 hours to two weeks to dry.
Quick and easy drying rack using paper tube wire hangers

Once the herbs pass the "crumble test," they are done and can be stored until you are ready to use them in a sealed jar or container.  I place bundles whole in glass jars or zip seal bags until i am ready to strip the stems into my still room jars for use in blends.
 
Savory crumbling perfectly

Sage perfectly dry
When I dry sage, I like the use the leaves with the best color to make rubbed sage.  So I will sort through the leave and separate out the leaves I like.  I crumble them in my hand to a coarse consistency.

Then I place them on a paper towel and using the balls of my fingers rub in gentle circles until I create a clumping powder.  


There are those who run sage leaves in a blender or grinder to make rubbed sage, but I think this lets too much essential oil escape and I prefer the hand method.  It does not take any longer and you have no extra cleanup!
rubbed sage ready for bottling

Thursday, October 18, 2012

Drying Your Herbs

I've chatted on this subject before, but I find that it helps to repeat this as new folks who have never worked with herbs may not realize how simple it is to dry herbs for winter use.


Ways to dry:

  1. Hang Drying – this is ideal for any long-stemmed herbs, tarragon, lavender, sage, rosemary, mints, lemon balm, etc.

Take stems and bundle together, tying them or holding them with a rubber band.  Depending on the size of the stem 10 to 12 stems is a good size bundle.  Choose a hanging location that has good air circulation, minimal light, especially sunlight, and dust.  In my first home I suspended a rack from the ceiling in the basement, draped a white bed sheet over the top to collect the dust and had plenty of air circulation under and around the herbs.  The average drying time is 1 to 2 weeks.  In humid places, like Illinois, running a dehumidifier during the muggy months can help.

Once they are dry, and you know they are completely dry when they crumble in your hand, you can crumble them into jars for long-term storage.  Or you can leave them on the stem for longer storage by placing them stem and all in a zip lock bag.  Herbs left on the stem will keep their flavor several months longer than those crumbled and a year longer than those ground or powdered.

  1. Screen drying – smaller leaf or stem herbs, flowers and other petite plants are perfect for screen drying.

Place herbs on a window screen.  You can also use cheese cloth stretched over a frame or even lay them out on paper towel on corrugated cardboard.  What you want is good air circulation again and minimal sunlight.  The herbs will dry in a week or less, but you may need to turn them over depending on your air conditions. 

I purchased scratch and dent window screens from a build supply store all the same size and shape.  For this we then crafted a frame where the screens could slide in and out to make access easier once during loading and unloading.


  1. Oven drying – can be used for any herbs, but is best for those that do not do well with longer methods, especially Basil.  You do have to be careful with sage that has a very volatile oil.

Remove the fresh leaves from the stalk and place them on an oven tray.  You can layer the tray with parchment to make it easy to remove.  There are two ways to use the oven, the short method and the long method.  The short method you place the tray in a warm oven (350 to 400 degrees) for only 5 to 9 minutes until the herbs are dry and brittle.  Do not walk away and leave them or you can end up with scorched herbs.  If you have picked the herbs previously (up to 24 hours ahead) you can reduce the oven temp to 250 to 300 degrees. 

The long method is easier because you can set it and forget it.  With the long method you set the over to 350 degrees and allow it to pre-heat.  Then take the tray of herbs and set in the oven after you turn it off.  Leaving the oven door open to allow moisture to escape and allow a couple of hours or overnight for the herbs to dry.  If you have a gas oven with a pilot light, you can use this method without turning the oven on.  It may take 6 to 8 hours to dry the herbs this way.

  1. Refrigeration method – this is perfect for herbs with small leaves, thyme, rosemary, marjoram, or savory.

Place the small leaved herbs on a plate or a square of cardboard laid with paper towel and place in the refrigerator.  You can also do this with basil leaves but the paper towel is required.  You can also place the herbs inside of a paper bag, fold the tip closed and set them in the back of the refrigerator for a few days.  In both cases check them frequently and stir them around to avoid wilting and ensure even drying.  The drying time varies depending on the herb.  Thyme is much faster, while basil may take more time.  Once they are dry place them in containers.

The down side of this method is you need extra space in refrigerator and you can have flavor transfer.  Strong foods stored in the fridge may flavor the herbs and some foods may pick up the flavor of the herbs. My husband loves when I do this becasue I clean the refrigerator before I place the herbs.

Do you have a favorite drying technique?  Which one gives you the most success?  Leave a comment and let’s chat about it.

Monday, September 13, 2010

Braiding Garlic to Dry

Those wonderful braid that you see in gourmet shops are wonderful decoration for your kitchen and useful too, because they properly store fresh garlic and keep it from moulding. To make one yourself is rather easy.


To do this you need garlic fresh from the garden with the leaves still pliable and not brittle. If you ask at the local farmers market, you can find a farmer who will gladly get you some with leaves still attached.

Steps to Braid Garlic:

1. Rinse off the natural dirt and choose the fullest heads. You are going to start with a group of three and lay them with heads together and stems crossing.

2. Braid the leaves together once or twice close to the heads. You want to braid tightly because you don’t want to see the leaves, just garlic.

3. Add a fourth head of garlic above the one in the center, weaving its leaves in with the center crossing the leaves of another. Braid a time or two.

4. Next add two more heads, these off to each side. Include their leaves with the other bunches and continue to braid.

5. Keep adding one, then two, then one, then two and braiding in-between for as long as you want until you run out of garlic.

6. To finish the top, braid the remaining leaves together tie with twine and trim the ends even. Hang it to dry. When you need garlic just snip off a head and use it.

If you love cooking with garlic, but don't grow your own, check out the Herb Mixes and Seasonings from the Backyard Patch.  We have rubs, marinades and others blends that are a garlic lover's dream.  See us at http://www.backyardpatch.com/

Friday, September 10, 2010

Dry your harvest!

I have used five different methods to dry the harvest from my garden. All are easy and I have listed them in order of energy and attention needed. Those that need the most attention are listed last.


Before you begin:

Always pick herbs just before the plant flowers to insure the strongest flavor.

Harvest in the late morning after the dew has lifted, but before the sun becomes too strong and evaporates the essential oils.

Cut only healthy herbs. Don’t worry about a few dead or damaged leaves; just pluck them off before the drying process.

Ways to dry:

                 1. Hang Drying – this is ideal for any long-stemmed herbs, tarragon, lavender, sage, rosemary,  mints, lemon balm, etc.

Take stems and bundle together, tying them or holding them with a rubber band. Depending on the size of the stem 10 to 12 stems is a good size bundle. Choose a hanging location that has good air circulation, minimal light, especially sunlight, and dust. In my first home I suspended a rack from the ceiling in the basement, draped a white bed sheet over the top to collect the dust and had plenty of air circulation under and around the herbs. The average drying time is 1 to 2 weeks. In humid places, like Illinois, running a dehumidifier during the muggy months can help.

Once they are dry, and you know they are completely dry when they crumble in your hand, you can crumble them into jars for long-term storage. Or you can leave them on the stem for longer storage by placing them stem and all in a zip lock bag. Herbs left on the stem will keep their flavor several months longer than those crumbled and a year longer than those ground or powdered.

                2. Screen drying – smaller leaf or stem herbs, flowers and other petite plants are perfect for        screen drying.

Place herbs on a window screen. You can also use cheese cloth stretched over a frame or even lay them out on paper towel on corrugated cardboard. What you want is good air circulation again and minimal sunlight. The herbs will dry in a week or less, but you may need to turn them over depending on your air conditions.


I purchased scratch and dent window screens from a building supply store all the same size and shape. For this we then crafted a frame where the screens could slide in and out to make access easier once during loading and unloading.

                3. Oven drying – can be used for any herbs, but is best for those that do not do well with longer  methods, especially Basil. You do have to be careful with sage that has a very volatile oil.

Remove the fresh leaves from the stalk and place them on an oven tray. You can layer the tray with parchment to make it easy to remove. There are two ways to use the oven, the short method and the long method. The short method you place the tray in a warm oven (350 to 400 degrees) for only 5 to 9 minutes until the herbs are dry and brittle. Do not walk away and leave them or you can end up with scorched herbs. If you have picked the herbs previously (up to 24 hours ahead) you can reduce the oven temp to 250 to 300 degrees.

The long method is easier because you can set it and forget it. With the long method you set the over to 350 degrees and allow it to pre-heat. Then take the tray of herbs and set in the oven after you turn it off. Leaving the oven door open to allow moisture to escape and allow a couple of hours or overnight for the herbs to dry. If you have a gas oven with a pilot light, you can use this method without turning the oven on. It may take 6 to 8 hours to dry the herbs this way.

                4. Refrigeration method – this is perfect for herbs with small leaves, thyme, rosemary,             marjoram, or savory.

Place the small leaved herbs on a plate or a square of cardboard laid with paper towel and place in the refrigerator. You can also do this with basil leaves but the paper towel is required. Check them frequently and stir them around to avoid wilting and ensure even drawing. The drying time varies depending on the herb. Thyme is much faster, while basil may take more time. Once they are dry place them in containers.

The down side of this method is you need extra space in refrigerator and you can have flavor transfer. Some foods stored in the fridge may flavor the herbs and some foods may pick up the flavor of the herbs.

                5. Microwave drying – good for small batches of herbs, especially those that need to dry quickly or risk turning moldy, like Basil.

Lay the herbs out on paper towel. Don’t fill the sheet too full, then place another towel on top. You can do multiple layers of herbs and toweling. Place the towel stack in the microwave and microwave on high for 2 minutes stopping every 30 seconds to be sure they do not burn. Remove leaves that become crumble dry and continue until all herbs are dry to the touch.

Do you have a favorite drying technique? Which one gives you the most success? Leave a comment and let’s chat about it.

At the Backyard Patch we make hundred of blends using dried herbs if you are interested in learning more about our combinations, visit us at http://www.backyardpatch.com/
Related Posts Plugin for WordPress, Blogger...