Monday, July 30, 2018

Grilled Mushroom and Green Bean Salad - Meatless Monday

The theme this month is Grilling, but I did not want to focus only on grilled meat so I worked on this meatless recipe that is wonderfully flavored and perfect for a summer dinner.

Grilled Mushroom and Green Bean Salad

½ pound large white mushrooms, halved
½ pound green beans, trimmed
1 red onion, cut into 1⁄2-inch-thick rounds
3 tablespoons olive oil
kosher salt and black pepper
½ teaspoon granulated onion
1 pound whole portabella mushrooms
1 teaspoon granulated garlic
½ teaspoon rosemary, broken
½ teaspoon dried thyme
4 tablespoons balsamic vinegar
1 bunch salad burnet or watercress, thick stems removed (about 4 cups)

Directions
Heat grill to medium-high. In a large bowl, toss the white mushrooms, green beans, onion, 1 tablespoon oil, ½ teaspoon salt, and ¼ teaspoon pepper, ½ teaspoon granulated onion. Grill these marinated vegetables (place the beans perpendicular to the grates to keep them from falling through), turning occasionally, removing them as they become tender, 8 to 12 minutes.

Meanwhile, season the portobellas with garlic, herbs and ½ teaspoon salt and ¼ teaspoon pepper. Grill alongside the vegetables stem side down, brushing occasionally with 2 tablespoons vinegar, 3 to 5 minutes per side, until tender and nicely browned.  Let rest for 5 minutes before slicing.

Divide the salad burnet / watercress, grilled vegetables, and sliced portabellas among bowls. Drizzle with the remaining 2 tablespoons oil and 2 tablespoons vinegar.

To find any recipe featured this month - use the search box and type: GrillJul
To find any theme recipe from this year type: recipe2018

For 2018 the monthly recipe themes will be:
   January - Chicken Soup (ChickJan)
   February - Beef Stew (StewFeb)
   March - Jambalaya (JambMar)
   May - Ham and Shrimp Dishes (ShrHamMay)
   June - Bread recipes (BreadJun)
   July - Grilling (GrillJul)
   August- Garden Delights 
   September - Salsa, Corn and Jelly 
   October - Squash Dishes 
   November - Pumpkin Recipes
   December - Herbal Cocktails 

Sunday, July 29, 2018

Lasagna Day Celebration!

I love that someone goes to the trouble of getting National Days and Months to remind me to try something new or renew acquaintance with an old 'friend."  This week I discovered that 7/29 is National Lasagna Day.  I actually celebrate this day, but I put it in January or February because I will make lasagna all day and freeze pans and give them away to friends.  I do it in winter because who wants to heat up the house cooking this time of year?


But in the spirit of  Lasagna Day, I thought I would share my Tried and True Lasagna recipe with you.  I recommend waiting until winter to make it when the weather is cooler, because the pot of noodles, pot of sauce and all the chopping and dicing might be too much even in air conditioning!

Marcy's Tried and True Lasagna

Sauce Ingredients
1/2 cup olive oil
1 pressed garlic clove
1 lb. ground round steak
1/2 lb. lean pork
2 cups Italian tomatoes
1/2 cup Italian tomato paste
1/2 cup beef or veal stock
1 1/2 tsp. salt
1/4 tsp. pepper
1 bay leaf
1 to 2 Tbls basil and oregano
   (or 1 - 2 Tbls. BYP Garlic & Herb Combination)


Sauce Directions:
Using a large dutch oven or 12 quart stock pot, saute the onion, then add the meats.  Brown the meats, then drain off the excess fat.  Add the garlic and stir until sizzling.  Add tomatoes, stock salt, pepper and bay and bring to a boil.  Reduce heat and allow to simmer over medium low heat for 2 to 3 hours to infuse flavors and cook down tomatoes.  Add herbs or BYP Garlic and Herb Mix and simmer another 15 minutes.  Remove from heat and begin assembly of lasagna.


Lasagna assembly ingredients:
a double batch of sauce
ricotta cheese
Parmesan or Parmasano-Regianno cheese
mozzarella cheese
cooked lasagna noodles
cooked sauce

Assembly:
Obtain ceramic or metal baking pans.  I use about 3 to 4  1-1/2 quart Corning Ware square casserole dishes.  I even have plastic lids for these now to go on top for easy storage. Make the sauce following directions above.  While sauce is cooking, grate the cheeses (or buy pre-grated that is fine.) When sauce is ready, cook the noodles according to package directions. Once noodles are a slightly hard l'dente you are ready to assemble lasagna.  Follow these steps for each pan.  Continue making until all noodles and other ingredients are used up.  Should make at least 3 pans depending on size.

Steps to assembly:
1. Place enough sauce to cover the bottom of the baking pan.
2. Add a layer of noodles side by side.
3. Spread on ricotta cheese.
4. Sprinkle with mozzarella cheese
5. Sprinkle with Parmesan cheese
6.  Spread sauce over all the cheeses.
7.  Add another layer of noodle running perpendicular to the first layer of noodles.
8.  Repeat steps 3 thru 6.
9. Continue layering cheese, sauce and noodles until pan is full, remembering to alternate the direction of the noodles with each layer.
10.  Top the last layer with a little extra Parmesan and mozzarella cheese.

Bake the Lasagna at 350 degrees for 45 minutes or until sauce and cheese is bubbling and top is slightly browned.

If storing for later use, do not pre-cook, just cover tightly and place in freezer.  Thaw completely in the refrigerator before baking.  If thawed bake as above.  If slightly frozen bake for 1 to 1-1/2 hours at 350 degrees.

Friday, July 27, 2018

Grilled Shrimp with Remoulade - Weekend Recipe


I found this recipe on the Food Network website and I thought this updated and untraditional rémoulade is an excellent tangy sauce for these spice-rubbed shrimp. You can make this one in the summer or save it to warm up your winter by grilling in the broiler.


Grilled Shrimp in Remoulade Sauce

For Remoulade Sauce:
1/4 cup reduced-fat mayonnaise
1/4 cup low-fat plain yogurt
1 tablespoon chopped flat-leaf parsley
1 teaspoon Dijon mustard
1/4 teaspoon hot sauce

For Shrimp:
2 teaspoons ground cumin
2 teaspoons paprika
1 teaspoon ground coriander
1/2 teaspoon garlic powder
1/4 teaspoon salt
1/8 teaspoon freshly ground pepper

36 raw shrimp, peeled and deveined (about 1 pound)

Directions:

To prepare sauce: Mix mayonnaise, yogurt, parsley, mustard and hot sauce in a small bowl. Cover and refrigerate. Preheat grill to high.

To prepare shrimp: Combine cumin, paprika, coriander, garlic powder, salt and pepper in a large bowl. Add shrimp and toss to coat with spices. Thread the shrimp onto four 12-inch skewers. Oil the grill rack. Grill the shrimp until just cooked through, about 3 minutes per side. Carefully remove the shrimp from the skewers. Serve immediately, with the sauce.

Make Ahead Tip: Cover the rémoulade sauce and refrigerate for up to 1 day.

To find any recipe featured this month - use the search box and type: GrillJul
To find any theme recipe from this year type: recipe2018

For 2018 the monthly recipe themes will be:
   January - Chicken Soup (ChickJan)
   February - Beef Stew (StewFeb)
   March - Jambalaya (JambMar)
   May - Ham and Shrimp Dishes (ShrHamMay)
   June - Bread recipes (BreadJun)
   July - Grilling (GrillJul)
   August- Garden Delights 
   September - Salsa, Corn and Jelly 
   October - Squash Dishes 
   November - Pumpkin Recipes
   December - Herbal Cocktails 


Monday, July 23, 2018

Grilled Spiced Broccoli - Monthly recipe - Meat less Monday


Adapted from a 2016 article in Grill it Bookazine this recipe gives you a great side dish, or a tasty main dish base.

Grilled Spiced Broccoli (Serves 6)


2 bunches broccoli
1/2 cup olive oil
1/4 cup tarragon or chive blossom vinegar
1 teaspoon onion powder
1 teaspoon garlic powder 
1 teaspoon dried chives
1 teaspoon smoked paprika
1/2 teaspoon salt
1/2 teaspoon crushed red pepper flakes
1/4 teaspoon pepper 

Cut each bunch of broccoli into six pieces. In a 6-qt. stockpot, place a steamer basket over 1 in. of water. Place broccoli in basket. Bring water to a boil. Reduce heat to maintain a simmer; steam, covered, 4-6 minutes or until crisp-tender. In a large bowl, whisk marinade ingredients until blended. Add broccoli; gently toss to coat. Let stand, covered, 15 minutes. 

Drain broccoli, reserving marinade. Grill broccoli, covered, over medium heat or broil 4 in. from heat 6-8 minutes or until broccoli is tender, turning once. If desired, serve with reserved marinade. Combine with cooked black or white beans for a high protein main dish.

Note: you can substitute Cider Vinegar for the herbal vinegar in this recipe.


To find any recipe featured this month - use the search box and type: GrillJul
To find any theme recipe from this year type: recipe2018

For 2018 the monthly recipe themes will be:
   January - Chicken Soup (ChickJan)
   February - Beef Stew (StewFeb)
   March - Jambalaya (JambMar)
   May - Ham and Shrimp Dishes (ShrHamMay)
   June - Bread recipes (BreadJun)
   July - Grilling (GrillJul)
   August- Garden Delights 
   September - Salsa, Corn and Jelly 
   October - Squash Dishes 
   November - Pumpkin Recipes
   December - Herbal Cocktails 

Saturday, July 21, 2018

Grilled Chicken with Tomato and Cucumber Salad - Weekend Recipe


Make this grilled chicken with a salad you make with farm-fresh veggies for a quick and light dinner.


Grilled Chicken with Tomato and Cucumber Salad


Salad:
1 clove garlic
1 teaspoon kosher salt, plus more to taste
1 tablespoon extra-virgin olive oil
1/4 lemon, juiced (about 1 tablespoon) or use 1 Tbls lemon herbed vinegar
1 cup tomatoes, sliced in rounds
1 cucumber, unpeeled, quartered lengthwise and sliced
3 pepperoncini peppers, stemmed and minced
1 tablespoon chopped fresh dill
Freshly ground black pepper

Grilled Chicken:
4 chicken breast halves, about 4 ounces each
Olive oil spray
Freshly ground black pepper

Directions
Smash the garlic clove, sprinkle with 1 teaspoon of salt and with the flat side of a large knife, mash and smear to a coarse paste. Put the garlic paste in a large bowl and stir in the olive oil and lemon juice. Add the tomatoes, cucumber, pepperoncini, and dill and toss. Give a couple of generous grinds of black pepper. Toss again, and set aside.

Preheat a grill pan or nonstick skillet to medium high. Spray the chicken breasts lightly with the olive oil and season with salt and black pepper. Grill the chicken, in batches if necessary, to avoid crowding the pan, turning once, until cooked through, about 2 minutes per side. Place each breast on a plate and serve topped with the tomato-cucumber salad.

To find any recipe featured this month - use the search box and type: GrillJul
To find any theme recipe from this year type: recipe2018

For 2018 the monthly recipe themes will be:
   January - Chicken Soup (ChickJan)
   February - Beef Stew (StewFeb)
   March - Jambalaya (JambMar)
   May - Ham and Shrimp Dishes (ShrHamMay)
   June - Bread recipes (BreadJun)
   July - Grilling (GrillJul)
   August- Garden Delights 
   September - Salsa, Corn and Jelly 
   October - Squash Dishes 
   November - Pumpkin Recipes
   December - Herbal Cocktails


Wednesday, July 18, 2018

Curry Plant - Herb of the Week


Curry plant is a curious and interesting little herb that may not be in the top five or ten choices on your herb wish list but definitely deserves your consideration.


Helichrysum italicum or curry plant the Herb of the Week

This tender perennial will grow well outdoors, it does best in U.S. zones 8 to 11. It can't tolerate a hard frost so grow as an annual above zone 8. It prefers soil that drains well, full sun and warm conditions. It's a perfect choice for intermittent drought prone areas or for a xeriscaped (low water) garden. If you have a spot behind a shed or garage that tends to reject your efforts in planting, curry plant may be a good choice there, too. It performs well in poor soil and isn't finicky about niceties like pH (although keeping things on the neutral side wouldn't hurt). Because it's such a good sport about water, it doesn't require mulching. It's also a natural pest repellent. Bugs tend to avoid it, and deer hate it. I grew it in a container with a coleus, as I picked mine up late in the season.  It wintered over nicely and is still flourishing in the container this summer. I originally got it to go in the rather dry side yard, but never actually put it in the ground.  Next year I think I will get several and use it as filler between perennials along with the darker coleus we put in that garden.

Growing to a height of about 30 inches or so, curry plant looks like a cross between lavender and rosemary. It has soft, gray-green foliage and produces small yellow flowers. It may require staking, especially in a windy location or a spot that sees a lot of foot traffic like a tree lawn.

Uses for Curry Plant

Curry plant is often promoted as an aromatic herb. Its common name derives from its scent, which can smell like curry. (As most of you know, curry is actually a blend of a variety of different spices that can vary from country to country and region to region, not the offspring of a particular plant.) When placed along a walkway, the aroma can be unexpected and enticing. To some folks, curry plant doesn't smell as much like curry as something else -- maple syrup. Regardless of how you interpret the aroma, it has a somewhat sweet, spicy and flowery note that seems at home with both sweet and savory fare.

I mention this because curry plant is sometimes maligned as pretty useless in the kitchen because it has a mild flavor. Much of its aroma is lost in cooking. As with pineapple sage, I think people expect curry plant to have more culinary power because it smells so nice. Even though curry plant isn't the flavor powerhouse promised by its complex and very compelling scent, it is still useful in the kitchen. Actually, there are a lot of uses for curry plant: Chopped fine it compliments mild dishes and ingredients like eggs, yogurt, mild cheeses and even fish. Chiffonade and add to chicken salad or egg salad. It enhances herb vinegar blends and dressings made with vinegar and makes a nice garnish, too. The gray/green foliage holds color when dried making it a nice addition to an herb wreath, swag or even potpourri.  The curry plant will look and smell nice there as well.

Growing Curry Plant

This useful little herb can be propagated from seed or cuttings, and the plant itself will survive for years in this way.  In Illinois it will not winter over, so treat it as an annual, but if you live in zones 8 to 11 it should stay around for at least 5 years before needing replacement.  It tends to get rangy and untidy after a while, though, and will become less productive after about the third or fourth year.

Young plants make unique gifts. Many gardeners are unfamiliar with curry plant and are immediately drawn to its aroma and soft, elongated, gray leaves. It's adorable and unusual.

Growing Curry Plant Indoors

Curry plant makes a very nice houseplant provided you can give it plenty of sun. This plant will need supplemental light if you can't give it six to eight hours of powerful light a day. A southern exposure close to the window is ideal. I've kept a curry plant indoors, putting it outside in spring and summer.  It's refreshingly undemanding which is what I require from an indoor plant. We kept it near the rosemary in the kitchen and the spicy aroma was nice in the bland landscape of winter in Illinois. When growing in a pot, make sure to add some sand to the soil for good drainage, and water it sparingly.


Recipes


“Curried” Vegetable Dip

1/2 cup sour cream.
1/4 cup mayonnaise.
3 oz cream cheese at room temperature.
1 teaspoon fresh lemon juice, or to taste.
1 teaspoon fresh chopped curry plant leaves
1/2 teaspoon salt
1/4 teaspoon turmeric
1/3 cup finely chopped celery
1/3 cup finely chopped peeled and seeded cucumber
1 scallion, trimmed and finely chopped

Directions

Whisk together all ingredients except celery, cucumber, and scallion until smooth, then stir in vegetables.  Serve cold with mixed vegetables.

“Curried” Deviled Eggs

I have a tendency to experiment with deviled egg recipes on a regular basis.  The blank pallet of a stuffed egg lends itself to many herb combinations.  Try this one the next time you make too many hard boiled eggs.

8 large eggs
1/3 cup mayonnaise
1 Tbls Dijon mustard
1 Tbls chopped fresh chives
1 Tbls fresh curry plant leaves, chopped fine
1/2 Tbls chopped fresh dill
Salt and pepper
Sprigs of herbs for garnish, optional

Directions

Put eggs in a single layer in a saucepan. Pour in enough cold water to cover eggs by 1 inch. Bring to a full boil over high heat. Remove saucepan from heat, cover and let stand for 10 minutes. Fill a large bowl with ice water. When eggs are done, immediately drain pan and plunge eggs into ice water. Let cool in ice bath for 2 minutes. Peel eggs carefully, keeping whites intact.

Cut eggs in half lengthwise and carefully remove yolks to a small bowl. Mash yolks with a fork until smooth. Stir in mayonnaise, mustard, herbs, then season with salt and pepper.

Using a teaspoon or a corner snipped zip lock bag, fill egg white cavities with yolk mixture. Sprinkle herb garnish over eggs, if desired. Serve immediately, or cover and refrigerate for up to 24 hours (garnish with herbs just before serving).


Tuesday, July 17, 2018

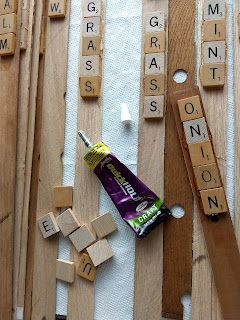
How Tuesday - Scrabble Tile Herb Markers


 One of the reasons I have been lazy about posting this spring is due to the fact my garden was on the Villa Park Garden Walk.  I was not even given a moment to post photos before it happened.  It was a bit more work than I realized when I agreed to do it.  But now the walk is over and I can enjoy the great garden I have and will share photos in upcoming days.

For now here are the steps I used to create the very popular scrabble tile herb markers that were all over my garden beds.


You only need a few materials to make these:
   Scrabble tiles (I got mine from garage sales and from Etsy suppliers)
   Waterproof Craft glue (I used "Quick Hold" craft glue)
   Wood strips (you can use paint stir sticks, but my carpenter hubby cut wood strips for me)


I placed a bit of glue on the back of a tile and placed it in position of the strip, centering side to side.  It is a bit mobile for a moment so I put glue on two other tiles and positioned them all together on the wood.


Once they were in position, I held them down with my fingers until the glue set somewhat.  I did not weight them down or use a press to hold them in place, just help with my fingers for a minute or less, then added three more tiles.


Once they were in position, not moving around, I let them sit on the table for 24 hours.  Then we sprayed them with spray shellac on both the front and the back and let that dry for another 24 hours before we put them in the ground outside.  

A few were not quite sealed and began to bow once it rained on them.  So we let them dry out and re-shellaced them to keep them garden ready.


That is it, nothing difficult, but they are easy to read, striking to see and fun to make!

So now you need to go Garage Saling.

Saturday, July 14, 2018

Pesto Topped Summer Squash - Weekend Recipe

The zucchini is getting ripe and we are joking it is time to close the car windows so you don't get donations.  But this recipe is great with that abundance and the basil that is also prolific this time of year.


Pesto Topped Summer Squash

1/2 cup chopped, fresh basil
4 to 5 leaves chopped, fresh parsley
1/4 cup toasted pine nuts
1 tablespoon extra-virgin olive oil
1 tablespoon grated Parmesan cheese
1 clove garlic, minced
2 teaspoons lemon juice
1/4 teaspoon salt
2 medium summer squash, (about 1 pound), sliced diagonally 1/4 inch thick
Canola or olive oil cooking spray

Preheat grill to medium-high. Combine basil, parsley, pine nuts, oil, Parmesan, garlic, lemon juice and salt in a small bowl (You can pulse in a food processor, but it is not needed.) Coat both sides of squash slices with cooking spray. Grill the squash until browned and tender, 2 to 3 minutes per side. Serve topped with the pesto.

To find any recipe featured this month - use the search box and type: GrillJul
To find any theme recipe from this year type: recipe2018

For 2018 the monthly recipe themes will be:
   January - Chicken Soup (ChickJan)
   February - Beef Stew (StewFeb)
   March - Jambalaya (JambMar)
   May - Ham and Shrimp Dishes (ShrHamMay)
   June - Bread recipes (BreadJun)
   July - Grilling (GrillJul)
   August- Garden Delights 
   September - Salsa, Corn and Jelly 
   October - Squash Dishes 
   November - Pumpkin Recipes
   December - Herbal Cocktails 
Related Posts Plugin for WordPress, Blogger...