Saturday, October 28, 2017

Elderberry Cordial Halloween Weekend Recipe


A plant with strong ties to Halloween is the elderberry, Sambucus nigra. A small, bushy tree with white flowers and almost black berries, the elderberry was associated with the Germanic goddess Holle (or sometimes Hulda) and was named Hollerbeier for her. 
Guardian of the dead, the goddess survives today in caricature as a Halloween witch. But as Frau Holle, she was a caring grandmother and wise crone. She helped souls cross over and took messages to them—perhaps written in elderberry juice ink. She is often seen as being half white and half black or being in both the world of the living and the dead.
Frau Holle, as she is known in Germany, was called The Queen of the Witches. The brothers Grimm tell a story of step-sisters who both go to visit Frau Holle in the 'nether realms'. They begin their journey to her by falling in a well........... Sandra Kleinshimdt, Encyclopedia Mythica
With the influx of German immigrants to the United States before the turn of the last century, these traditions were brought here.  In North America, European immigrants found their elderberry’s close relative, S. canadensis, and continued their traditions. People carried pieces of its wood for protection, tied prayers to its branches and left apples beneath it as offerings. Among the Pennsylvania Dutch it is the number one magical plant.

The elderberry is revered for its health benefits.  Since the time of Hippocrates, the benefits of taking elderberry in all its forms have been touted and shared. A tea from its flowers treats cold and flu symptoms, substantiated by the German Commission E (that country’s equivalent of the U.S. Food and Drug Administration), and its berries are rich in antioxidants and vitamin C. 
Flowering Elderberry courtesy of Tina Sams
So I felt it only perfect to share an Elderberry Cordial recipe for the weekend.  The dark purple color also makes it perfect for a Halloween gathering!

Elderberry Cordial
recipe adapted from Hollerbeier Haven newletter
1 quart fresh ripe elderberries, stems removed (frozen will do also, but not dried)
1 cup water
1/2-inch piece of ginger root
1 teaspoon whole cloves
1/2 teaspoon whole allspice 
honey and brandy (proportions below)
Combine berries with water.  Simmer over low heat for 40 minutes, or until berries begin to release their juices.  Mash with a potato masher to get all the possible juice.
Strain the pulp from hot berry juice and return liquid to a clean pot. Add the ginger, cloves and allspice and simmer for 15 minutes.  Strain again.
Craft the cordial by measuring the amount of spiced berry liquid you have and add an equal amount of honey and 1/2 of the amount of good brandy.  Bottle it and store until you can enjoy it on Halloween.

Wednesday, October 25, 2017

Fall Garden Clean-up

How much do you hate cleaning up your garden in the fall?

I used to.  When I looked out my kitchen door and saw more brown than green, I would grimace and think, “…next weekend.”  Inevitably, clean up kept getting pushed back by other, more pleasing events.  But there comes a moment when I cannot put off the inevitable; I have to clean up the garden and put it to bed for the winter. Preferable before the heavy rains set in. But I like brisk weather and a clear brisk fall day is perfect to clean out the garden beds and I know I’ll be glad I did in the spring!


Garden Clean Up Tips
Anyone who has gardened for a few years has come up with their own tips and tricks for making garden clean up a bit easier.  I have discovered a few things that might make life easier for any organic gardener.

Be prepared.  When I go out to clean up, I always bring the tools I’ll need to make it easier.  So my tool chest contains:
1.      1. Scissors – the knots you used to tie up tomatoes will be real tight after a summer of rain and heat.  Trying to pull them off just frustrates.
2.      2. Pruners – if you try to cut back blackberries or blueberries without them, the chances are you’ll do more damage than good.  These small, sharp sheers can cut through up to an inch of stalk or wood.
3.      3. Shovel – I sometimes need to coax some of the plants from the ground.  Eggplant and tomatoes get stems more than an inch in diameter and their roots can extend up to 10 feet from the base of the plant.  So, a bit of shovel power comes in handy.
4.      Rake – I prefer the good, old-fashioned garden rake because it’s heavier than a leaf rake and the tines won’t work against me as I rake up fallen tomatoes and peppers.
5.      Bucket – I use an empty kitty litter container and I use it to pick up all the tomatoes that hit the ground at the end of the season.
6.      Garden gloves – I also coat my hands in lotion and scrape a bar of soap under my nails to make the cleaning up of me afterward a bit easier.

Clearing the Ground
I actually find this the most motivating.  Pulling off tomato cages, cutting vines out of my trellis and fence and tearing up the roots of the dying plants gives order back to my space and lets me see the promise of next year.  All annual vegetable and herbs plants need to be removed and moved to the compost bin.  The perennials like asparagus, blackberries and most herbs can be thinned, mulched and trimmed one last time.  Save your trimmings of the herbs to use for dinner tonight! If the flowers I use for pest control (and to jazz up the greenery), like marigolds, zinnia, nasturtiums and petunias, are still blooming, I leave them alone.  If they’re finished, they get tossed, too.

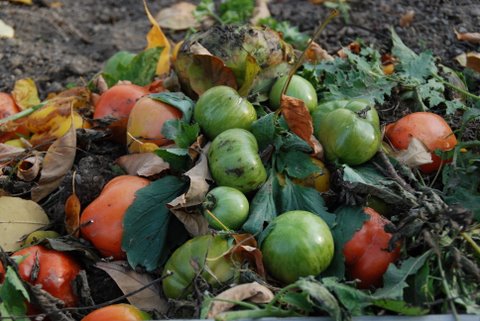
One last task remains before you can move from clearing to covering.  If you grew tomatoes, grab a bucket and pick up all of the fallen tomatoes off the ground.  If you don’t you will have a whole lot of baby tomatoes to pull up next year.  This is a gooey task but well worth the effort.  The same is true if you have a large squash or pumpkin patch.  They will send more volunteers than you want to weed out in the spring.

Once the ground is cleared, it’s time to cover it.

Blanketing the Garden
The last step in garden clean up is to lay down ground cover.  In my garden, that means a recipe of cardboard, newspaper, leaves and grass clippings (only use the grass if you do not treat your lawn.)


Cardboard goes down first.  I use it mostly to create a barrier along the edge of my garden where crab grass and creeping Charlie like to lurk, slip under the edges and set up house in my garden.

Once the cardboard is down, I put down a layer of leaves.  The last layer I put down is grass clippings.  Heavier and denser than leaves, they hold them in place.  Both break down nicely, enriching the soil and making it better, every spring, for the seedlings to grow and thrive.

I have raised beds in the yard, but wet winters can cause these to rot so it has been my habit to remove the sides in the fall, use the cardboard to hold the shape in place and replace the beds in spring turning the edges into the middle of the bed and thus turning the soil a bit when I replace the beds. 


Tuesday, October 17, 2017

How Tuesday - Chocolate Dipped Spoons

Stir a little sweetness into a cup of coffee or cocoa with a seasonal spoon.  I love making chocolate spoons.  They make great favors, wonderful gifts and they are fun to use.

For Halloween they can be decorated to be ghosts, spider webs or other spooky creatures and for Christmas or Hanukkah they can be sprinkled with colored sugar in appropriate colors.

Candied Spoons

12 oz. pkg semi sweet chocolate chips
2 tsp coconut oil
35 to 45 plastic spoons (you can use white, black, gold or silver or a mixture)
Candies, nonpareils and colored sugar for garnish

Line baking sheets with parchment paper and place a couple of round handled spoons in the middle of the baking sheet.

Place chocolate chips in a microwave safe bowl and microwave on medium for 30 seconds.  Stir to be sure all the chips have melted.  Add shortening to thin chocolate and stir gently.


Dip each spoon into chocolate mixture to cover the bowl of the spoon.  Place on parchment paper with the bowl edge resting on handle of wooden spoon to keep it above the paper.

After chocolate begins to harden, but is still soft add sprinkles of colored sugar, mini chips or other decorations to the chocolate.

Once chocolate has hardened (which will take some time), wrap each spoon with cellophane or a small plastic bag.


Alternates: Use white chocolate and add two mini semi-sweet chips for eyes to make ghosts, or sprinkle with blue sugar for a Hanukkah treat. Use a large marshmallow on a stick instead of a spoon for the perfect cocoa stir.


Decorate with tags and ribbon for favors and gifts.

Wrap each spoon in cellophane and place in a mug to display.

Tie them with ribbon to a package of hot cocoa or coffee to make a teacher or friend gift.


Friday, October 13, 2017

Home Made Vanilla Extract - weekend recipe

My infusion program, which is gaining popularity, details how to infuse the flavor of herbs into different mediums (technically called a menstruum.) As part of the program I demonstrate how to make tisanes, simple syrup, flavored salt and sugar, and alcohol extracts.  One of the infused alcohol items I demonstrate is vanilla extract. 


Recently I have been making zucchini bread with the vanilla extract I created as part of these demonstrations.

This could be termed the easiest herb recipe you can make:

Hand-made Vanilla Extract

You need

8 ounces of plain vodka
2 to 4 vanilla pods (organic is best of course)

Put the pods in a glass jar, cover them with the vodka.  Cover and leave in a closed, labeled jar for six weeks.

After 6 weeks, you have the most wonderful vanilla infused vodka that you can use to make all your holiday baked goods.

And if  you want to start now it will make a great gift for the baker in your life.

**Important – this is not “Vanilla Vodka”. In other words – do not attempt to drink the vodka after the vanilla has been added! Consider the fact that only a few drops of vanilla extract are typically used for an entire recipe… yes, it will be like that.

If you want to try a couple other infusions using vanilla for your home or face, check out my Herb of the Week post on Vanilla.


Monday, October 9, 2017

Celebration of Roman Goddess Felicitas

On this day, Ancient Romans celebrated Fausta Felicitas, an ancient Roman Goddess of good fortune and lucky happenstance. Her name is essentially two words of the same meaning, likely doubled up for emphasis, for fausta in the Latin is the adjective "favorable" or "auspicious", while felicitas is the noun meaning "luck", "good fortune" or "happiness"; Her name can be translated as the nicely redundant "Lucky Luck"Felicitas, the goddess of good luck, on this day. 
Felicitas was shown on coins of the Empire in a variety of poses, usually holding the caduceus, or herald's staff (an attribute of Mercury or Hermes, said to represent peace) and the cornucopia, or horn of plenty. She could also be depicted holding a patera (offering dish), or with a rudder, ship's prow, or globe, all of which are also attributes of Fortuna.


Create your own special celebration of the Roman goddess Felicitas by making a list of the good fortune you have experienced in the past month. If you're not feeling so lucky, here are a few herbs that might help.  You can plant them or wear them.

  • Allspice promotes luck, health, and happiness.
  • Chamomile is the gambler's lucky herb. In Rome, gamblers washed their hands in chamomile for luck.
  • Thyme is the traditional herb of courage, and was often used as an ingredient in teas, soups, and as a main ingredient in tokens and sachets to encourage good luck in battle, in overcoming shyness, and in 'winning the day'. The word thyme may well derive from the Greek thymon, which means courage.
  • String nutmegs, star anise, and bits of sandalwood in a lucky necklace.
  • Peppermint (Menta Piperita), love and protection are this plant’s best uses. Softens roads and relationships, and makes a wonderful addition to healing, prosperity and luck amulets. A fairy attractor when planted.
  • Plant hen and chicks (Sempervivum) on your roof to bring good fortune.
  • Plant rosemary by the door for luck. 
  • Spearmint has been used as protection against curses or to attract money.
  • Honeysuckle brought into a home will help ensure a good marriage for the people who live there. Grow honeysuckle near your home to attract love, luck and wealth and to protect your garden from negative influences.

Wednesday, October 4, 2017

Energizing Bath Sachet Blend - Bath Blend of the Month

The days are getting noticeably shorter now, so a pick me up may be needed.  This energizing bath blend could be just what you need.  Mix it up and place 1/4 cup of blend in a muslin bag.  You can make the bags ahead or keep blend in a jar and place 1/4 cup in a muslin bag or terry cloth and drop in the bath while it is filling.


Energizing Bath Sachet Blend
½ cup lavender buds
½ cup peppermint leaves, crumbled
½ cup spearmint leaves, crumbled
½ cup lemon grass, cut small
8 drops lavender essential oil
10 drops lemongrass oil
5 drops each peppermint & spearmint essential oil


Blend the herbs together in a plastic bowl, then add each essential oil separately and stir to combine.  Allow to meld overnight, then fill muslin bags and store in an airtight container.  This recipe will make up to 8 bags.

To Use: Place filled bag under the tap while bath is filling, then slide into the water.  Use the bag as a scrubby to get even more herbal energy!

Monday, October 2, 2017

Meatless Monday Creamy Herb Dressing

If you like a cream dressing but cannot use milk or cream in your foods, this versatile recipe may be your solution.  Tofu provides the creaminess without the cream. Make the dressing with any herb that matches your meal or mood. Serve over your favorite greens.

I recommend making a combo of three herbs, like basil, savory and lemon balm or lemon basil, thyme and oregano.

Creamy Herb Dressing

  • 1⁄2 cup soft silken tofu (4 oz.)
  • 1⁄2 cup tightly packed fresh herbs, such as basil, dill, cilantro or a combo of three herbs
  • 3 Tbs. olive oil
  • 2 Tbs. water
  • 1 Tbs. fresh lemon juice, plus more if needed
  • 1⁄2 tsp. salt, plus more if needed
Directions:
In blender or food processor, combine all ingredients and 2 tablespoons water. Process until very smooth, scraping down sides of bowl once or twice, about 2 minutes.

Use immediately or refrigerate in tightly sealed container for up to 3 days. (The vibrant color will become olive drab, but the taste will not be affected.) Stir well before each use. Thin with 1⁄2 teaspoon lemon juice or water (or more if needed) if dressing becomes too thick.

This recipe adapted from one in Vegetarian Times
Related Posts Plugin for WordPress, Blogger...