Showing posts with label homemade gifts. Show all posts

Sunday, October 26, 2025

Preserving the Harvest: Making Herb Salts, Vinegars, and Syrups Before Frost

As the last golden days of fall arrive and the garden begins to slow, now’s the time to capture those fresh herbal flavors before frost claims your plants. Preserving herbs into salts, vinegars, and syrups lets you savor their fragrance and taste all winter long — or share them as thoughtful, homemade gifts.

ðŸŒŋ Herbal Vinegars: Bright and Beautiful

Herbal vinegars are the perfect way to capture the essence of your garden in a bottle. They’re lovely for salad dressings, marinades, or drizzling over roasted veggies.


Try these combinations:

  • Rosemary & Garlic Chive Vinegar – Earthy, aromatic, and perfect for roasted potatoes or chicken.
  • Tarragon & Shallot Vinegar – Ideal for vinaigrettes and fish dishes.
  • Basil & Oregano Vinegar – A perfect flavor to splash over tomatoes or toss with olive oil and pasta.

How to Make It:

  1. Fill a clean glass jar half to two-thirds full with fresh (washed and dried) herbs.
  2. Warm your vinegar slightly (white wine, distilled white, or rice vinegar with 5% acidity).
  3. Pour over herbs, leaving about an inch of headspace. 
  4. Bruise the herbs with the handle of a wood spoon.
  5. Cover tightly and let infuse for 2–3 weeks in a cool, dark place.
  6. Strain and bottle in decorative jars — they make charming kitchen gifts!

Add your creation to Backyard Patch Italian Dressing Mix or Lemon Chive Dressing Mix and enjoy at your holiday table.

🍎 Simple Herbal Syrups: Sweet and Soothing

Herbal syrups add flavor and flair to tea, sparkling water, mocktails, and desserts.

Flavor Ideas:

  • Thyme & Lemon Syrup – Uplifting and bright; delicious in tea or with plain soda.
  • Anise Hyssop Syrup – Lightly licorice and floral; pairs beautifully with gin-style mocktails.
  • Lemon Verbena Syrup – Perfect for cocktails or drizzled over fruit salad.

How to Make It:

  1. Combine 1 cup water and 1 cup sugar in a saucepan.
  2. Bring to a simmer, stirring until sugar dissolves.
  3. Add a generous handful of herbs (about ½ to 1 cup) and stir for 1 minute.
  4. Remove from heat and cover.
  5. Let steep 30 minutes or until it reaches room temperature, strain, and refrigerate up to 2 weeks.

Use these along with the drink suggestions in our Backyard Patch Beginner Mocktails book.

🧂 DIY Herb Salts and Sugars: Quick Gifts from the Garden

These are ridiculously easy to make and keep the essence of herbs long after the garden fades.

Herb Salt Ideas:

  • Rosemary & Sage Salt – Great for roasted vegetables and meats.
  • Basil & Marjoram Salt – Adds a burst of summer to pasta dishes.

Herb Sugar Ideas:

  • Scented Geranium Sugar – Perfect for baking or tea.
  • Mint Sugar – Adds a cool twist to hot cocoa or cookies.

How to Make It:

  1. Layer salt or sugar with fresh herbs leaves in a shallow jar (or pulse in a blender).
  2. Use a ratio of 4 parts base to 1 part herbs.
  3. Allow to meld for two weeks, then remove leaves whole (if using a blender, spread out on wax papaer to dry for 48 hours before storing.)
  4. Store in airtight jars.

Keep near the stove with a jar of Backyard Patch Herbs Seasonings as ready-to-use cooking aids.

🎁 Gift Idea: “Preserve the Harvest” Basket

Bundle your homemade herb vinegar, a jar of herb salt or sugar, and a bottle of syrup with one of our Backyard Patch Herb Mixes for a thoughtful, garden-inspired gift. Add a sprig of dried herbs and a recipe tag for a personal touch.

ðŸŠķ Suggestion:
A woven basket with a bottle of herbal vinegar, a jar of salt, a syrup bottle, and a tea blend or seasoning packet — all nestled in kraft paper and tied with a raffia bow.

🌎️ Don’t Let Frost Steal Your Flavor

Taking a few hours to preserve your herbs now means you’ll have a taste of summer all winter long. Whether you enjoy them in your kitchen or give them as gifts, these simple projects keep your herbal harvest alive — in the most delicious ways possible.

Sunday, December 4, 2022

Bath Ball Gift Jar

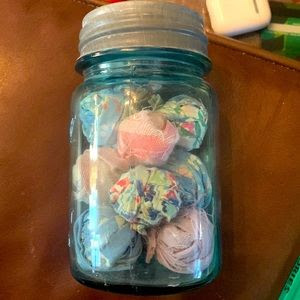
Need something class and special at the last minute.  Try this bath ball mix in a decorative jar. I have shared bath ball recipes in the past, but this recipe is minty and floral, curative, and makes a wonderful gift. Place a collection of bath balls, tied up in seasonal fabric in a quart canning jar, and present them to a teacher, pet sitter, or another person you want to reward with a little me time.

Bath Ball Blend


1 cup mint, dried
1 cup rosemary, dried
1 cup lavender, dried
1 cup rose petals, dried
1 cup comfrey leaves, dried and crumbled
1 cup lemon balm
4-inch squares of fabric
ribbon

Combine dried herbs. Scoop 1 heaping teaspoon of mixture into the center of the fabric and tie the ends up with ribbon. Place balls in a glass and tie on instructions

To use: Use one ball per relaxing bath. You can tie the ball under the tap and let the water run through it, or steep the ball in 1 cup of boiling water for 15 minutes and add the liquid to the bathwater.

Wednesday, October 27, 2021

Herbal Gifts DIY

Coming up on Nov 6 we are presenting our Making Herbal Gifts program at District 214 in the Arlington Heights, IL  Area, so I thought I could share this blog post I first wrote as a Guest post on the Supporting Artists blog in December 2012.  The best thing about this is it is timeless and these items are great to make and perfect as gifts.

Using and gifting with herbs is such a special holiday treat. I thought I would share a few simple ideas that you can use to herb up your Holidays.

As an herb gardener, I enjoy the scents and smells of herbs, but this time of year the smell of spices is just as appealing. I craft these simmering spices to give my home the smell of gingerbread even when I do not have time for baking.

Simmer Spices

§  6 whole cinnamon sticks, broken

§  1 Tbls. whole allspice

§  1 Tbls. orange rind

§  1 Tbls. whole cloves

§  A handful of pine needles or fir needles, or you can substitute 2 Tbls. of Rosemary

Place all the items with water to cover in a simmer pot or place in a saucepan on the back burner with enough water to cover and keep on simmer. Refill the water whenever it gets low and enjoy the smell of Christmas!!

Seasoned Nuts

This is a recipe I share with my friends each year. I make it to serve at open houses. As a favor or gift I give my Backyard Patch Cinnful Dessert Blend with the recipe attached to those visiting. It is simple and easy to make and you can change up the nuts to suit your palate. If you do not have any Cinnful Dessert Blend, try pumpkin pie spice or just plain cinnamon.


Stirring the seasoned nuts, just before the oven

Cinnful Nuts (Cinnamon Roasted Nuts)

§  1/2 cup pecans

§  1/2 cup walnut halves

§  1 cup peanuts (see note below)

§  1 egg lightly beaten

§  1 tsp. water

§  3/4 cup sugar

§  1 Tbls. Backyard Patch Cinnful Dessert Blend

§  3/4 tsp. salt

Steps:

Combine the nuts. Mix together the egg and water and toss with the nut mixture. Combine the sugar, spices and salt and toss that with the nuts until they are well coated.

Spread nuts in a single layer on a lightly greased cookie sheet. Bake at 300 degrees for 20 to 25 minutes. Break up any large clusters and allow to cool.

(* NOTE: You can remove peanuts and increase the other nuts by ½ cup to make a different mixture. Or substitute hazelnuts for the peanuts.)

Inspiration Stimulation

tea and scones

When your creativity starts flagging because of all the pressure and use this delightful recipe for tea that combines sweet and savory herbs to construct a creative frame of mind. As a gift I tie 2 teaspoons of the herbs into cheese cloth squares or coffee filters and stack them in a decorative jar with a label including instructions.

§  1 Tbls. Hibiscus

§  1 Tbls. Lemon grass

§  ½ Tbls.Basil (Holy Basil if you have it is even better)

§  1 tsp. Rosemary

§  1 tsp. Cardamom seed (if you have pods crush and extract only the seed)


Combine in a container with a tight-fitting lid and use 2 tsp. per cup of hot water. Allow to steep 5 to 7 minutes.

Energizing Bath Bag Blend

Need more energy this holiday season? This combination of energizing herbs could do the trick. Create this blend of herbs and use it for yourself or make up a batch with your family and give them as gifts. The recipe makes 8 cloth bags of bath blend.


§  ½ cup lavender flowers

§  ½ cup peppermint

§  ½ cup spearmint

§  ½ cup lemon grass

§  8 drops lavender essential oil

§  10 drops lemon grass essential oil

§  5 drops peppermint essential oil

§  5 drops spearmint essential oil

Combine all herbs in a plastic bowl. Add oils by the drop and stir with a plastic spoon or spatula (not with your hands.) Allow to meld for an hour and then place about ¼ cup in a cotton muslin bag or heat sealed tea bag.

TO USE: Allow bath bag to steep in hot bath water for 3 to 5 minutes before bathing.

I hope you enjoy these recipes and if you like herbs, please visit my Shop where I highlight not only my cooking and tea herbs, but also baking mixes, soups mixes, and seasonal spices: www.backyardpatch.com or you can visit me at www.backyardpatch.etsy.com


Tuesday, April 28, 2020

DIY Spring Scented Coasters - Homemade Gift Series

DIY Spring Scented Coasters
These simple scented hot pad coasters are the perfect gift for any coffee or tea lover in your life, including yourself!

NOTE: The rice needs to sit for about 24 hours to absorb the scents properly before you put the hot pad together, so plan ahead when doing this project!
Here’s what you need for this project:

·         5″ x 12″ piece of pretty fabric for the outside of the coaster (I used 100% cotton in a fun pattern)
·         two 4.5″ squares of plain muslin
·         plain, uncooked rice
·         100% essential oil in your favorite scent
·         Zip seal bag
·         Needle and thread or sewing machine


Steps:
1.      Prepare the rice. Put about one cup of rice into a zip seal bag and add 6-7 drops of your favorite essential oil. Seal up the bag, shake the rice around so the oil is mixed in, and set the bag aside in a cool, dry place for 24 hours so the rice can soak up the scent.
2.      Once your rice is nice and scented, it’s time to make the coaster. First you’re going to make an envelope style cover for the outside.
3.      Fold over half an inch of fabric at one short end of the rectangle of outer fabric, and hem the end by sewing along the fold with about a 1/4″ seam allowance. Repeat on the other short end.
4.      Fold the long strip of fabric, right side in, so that both ends overlap each other about an inch or so. You want the final dimensions of the cover to be 4.5″ long, so adjust accordingly.
                               
5.      Sew along the open edges, leaving a 1/2″ seam allowance. Clip the corners and turn the envelope cover right side out.
6.      Then pin the two muslin squares on top of each other and sew around all four edges with a 1/4″ seam allowance, leaving a small hole on one edge to add the rice.
7.      Use a funnel to pour the scented rice into the muslin pouch. The fuller the pouch, the more stable the coaster will be, so fill it as full as you can! Then sew the small opening closed.
8.      Put the small muslin pouch inside your envelope cover, and you have your very own scented hot pad coaster! Warm up a mug of tea or coffee and test it out!
The reason I made this coaster in two pieces rather than just making a pouch of the pretty outer fabric is because it’s easily replaceable this way. If the rice loses its scent, just make a new inner muslin pouch with a new batch of rice, and you don’t have to get rid of the pretty cover! Or just use a seam ripper to pull open a corner of the muslin pouch and switch the rice out with freshly scented rice.
You could also switch up scents if you want to! If you have three or four favorite scents (maybe one for each season?!), make a muslin bag full of rice for each scent, and just switch them out into your favorite cover and you have a “new” hot pad each time! You should store your scented hot pad coaster in a plastic baggie when you’re not using it to keep the scent fresh and strong!


Thursday, April 23, 2020

Special Mother's Day Gifts at Home - How Tuesday Herb Pounding

Mother's Day is right around the corner, so I thought I would start sharing a few make at home gifts you could do yourself.  And to combine with it, we are so excited to be giving away $350 in gift cards for Mother's Day to four lucky readers. The giveaway will run from April 23 – May 8.  


For the next couple weeks we are going to give you instructions for some personalized herb theme gifts  to make for your Mom. and if you visit the other bloggers in the links at the bottom you will get entries in the drawing.  Have fun explore and creating!

Herb Pounded Gifts

Tools Needed
parchment paper/wax paper
rubber mallet
fresh herbs, leaves or flowers
card stock, note cards, plain gift bags or plain white napkins

Steps
You need a sturdy table or the floor to do this craft, as you will be pounding things and don't want to take out a table in the process.

Line the table with newspaper or torn brown paper bags to protect the surface.

Gather some fresh herbs, leaves or flowers from the yard.  The brighter the color the better the transfer in pounding.  You can even gather some grass fronds.

Do a test run to see how this works and get a feel for how hard or soft you need to pound.


I use a few pieces of card stock to test my flowers.

You place the flower/leaf face down on a sheet of white paper. Place parchment or wax paper over the greenery. Pound with a rubber mallet, being careful not to allow the flower/leaf  to reposition itself.  


Don't pulverize it, just pound it hard enough to break open the cells of the plant so they release the color onto the paper.


Once you get the hang of how hard or not hard to strike, then you can move to your real items.

Again lay your item flat on the surface.  Place the flower, leaves or grass on the surface 
Cover with parchment. Pound with the rubber mallet to transfer the color.

Remove the parchment and remnants of greenery and compost them.  Then add different layers of color with other leaves and plants.


You can add some drawn art to fill in the colors or just go with the natural pounded flower look.


If you use card stock, trim the card stock to fit in an envelop and you have stationary for Mom.

or if you use a gift bag, you can put other gifts inside your homemade bag. And maybe that gift are these great grass decorated napkins.

Like a grass stain these are hard to wash out, so the napkins are totally washable, the grass patterns will fade over time, but it will take a while.  Have fun and get outside!


Monday, December 10, 2018

Holiday Swapping - a great way to save money and reduce waste

Reduce, reuse, recycle has been my thing the last few years.  I really wanted a lighted snow flake on my house, but the price was making me unhappy, so when I saw one at the resale shop last summer I bought it, even though when I plugged it in at the store, I realized that the upper corner did not light. So this year when I put it up, I found a way to disguise the broken section.  I recycled a decoration no one else would probably buy and still have my snow flakes!  


I was trying to figure out how to apply the idea of recycling to other Holiday excesses I see in December and I finally figured it out. 

Holiday Swapping

Now when I say Holiday swap most people think of a cookie swap.  Cookie swaps are great.  You bake your favorite cookies and swap with others who make their favorite cookie then everybody has an assortment. Churches often do it as a fund raiser too!

However if you think outside the cookie box, there are a few other things you can swap at Christmas that can help reduce waste and encourage recycling.

Holiday Decoration Swap. Some holiday decorations are near and dear to us.  Others are the equivalent of movie extras, just adding to the overall effect.  Trade away the ones you don’t love for some new-to-you items. You can get your snowflakes too!

You can also recycle your Tomato cages into a Christmas tree.  There are a million (maybe I exaggerate) ways to do this posted on Pinterest.  I just wrapped one cage in faux evergreens and a silver garland, then put old-fashioned Christmas lights on it that I got in a trade with a friend who wanted strands all in one color that I was not interested in using anymore.  The rings on the cage make it easy to clip or wrap things, so I was able to make the tree in about an hour with these faux evergreens I recycled from a bunch of mini trees I dumpster dived about 6 years ago. I guess the sled is recycled too!  It was my childhood sled which was faded and rusted.  A bit of spray paint and it became part of my snowflake Christmas theme.


Accessory Swap You can also reuse the items you decorate yourself with, find a few friends and have an accessory or scarf swap.  You know you get tired of that scarf after a full season, so have everyone bring a few winter accessories in like new condition.  This can include jewelry, gloves, sweaters, and scarves.  You can swap and exchange and update your look instantly with no money!

pounded flower note cards
Wrapping paper Swap Another big part of the holiday is the wrapping paper. It is a drag to wrap all your gifts in the same paper, but gift wrap can be expensive.  So divide each roll you buy in half and trade with a friend for half a roll of their paper.  You get twice as much.

You can also make your own wrapping paper. I save packing paper which comes in boxes that get delivered and smooth it out and stamp it, or pound it.  Pounding is actually a very old activity that includes taking flowers and leaves and pounding them onto paper to get the colors and textures of the plant.   You use a rubber mallet and a hard surface cushioned with layers of paper so you do not smoosh the items totally flat, but allow the colored pigments to transfer to blotting paper, card stock or kraft paper. 

I have also used fresh herb leaves as a stamper.  Press the leaves into the ink pad and onto kraft paper.  Wrinkled paper hides slips, tears and other blemished and just makes rustic wrapping paper.  Makes some torn fabirc ribbon and you have great homemade packages!

You can make wrapping paper and cards this way, and the plants vary from season to season, so you can do it all year.


Related Posts Plugin for WordPress, Blogger...