Showing posts with label winter. Show all posts

Friday, November 4, 2022

Holiday Bath Salts - Bath Blend of the Month

We do not make many bath items at Backyard Patch Herbs anymore.  Twenty-five years ago, when I first started I made Dill Dip Mix, Italian Dressing Mix, 6 herbal teas and a Scented Bath Salt recipe.  As I learned more about herbs and experimented with my herbal harvests I crafted an explosion of items for cooking, tea and bath, numbering more than 250 products.

The variety of things you can create for the bath are massive.  The number of recipes I was maintaining and creating became a monster that I could not even display at a show because there was not enough room.  After serious consideration, I decided that those recipes would be retired from my catalog and I would instead share them here monthly instead.  If you have a favorite bath items you need me to make, you can always message me or speak to me at a show and I can make them special, but you will no longer find them on my websites once the current inventory is sold. We reserve the right to bring a few favorites back for the holidays, however.

This month's bath recipes of the month are two that I developed when my General Scented Bath Salts became "boring" to make.  Both of these are great for helping skin and soothing nerves during the winter season.

herbed bath salts in a snowflake decorated tin

Restorative Bath Salts 

The combination of essential oils in the blend is designed to relax and restore, not only the skin and muscles, but the mind as well.  When days get shorter and stresses increase sometime the body just needs a bit of help with rejuvenation, These salts are perfect for that.

  • ½ cup Epsom salts
  • ½ cup sea salt
  • 1 cup baking soda
  • 15 drops frankincense oil
  • 15 drops lavender oil
  • 10 drops bergamot oil
  • 10 drops rose geranium oil

Combine dry ingredients in a bowl and add essential oils by the drop.  Stir well to combine and remove the essential oils lumps so the scent is evenly distributed into the base salts.  Once they are combined transfer to a jar with a tight fitting lid.  

TO USE: Add 4 Tablespoons of salts while filling the tub.  You can also use 2 Tablespoons for a foot soak.

Warming Winter Bath Salts 

The combination of essential oils are scents that are good for men and women.  You can make it into a soaking salt or you can add grapeseed oil and make it into a salt scrub to use in both the shower and bath.  Just add enough grapeseed oil to cover the salts and the scoop out by the handful to use as a scrub.

  •  1 cup Epsom
  •   1 cup baking soda
  •   30 drops sandalwood oil
  •   10 drops sweet orange oil
  •   5 drops ginger oil
  •   3 drops patchouli oil

Combine dry ingredients in a bowl and add essential oils by the drop.  Stir well to combine and remove the essential oils lumps so the scent is evenly distributed into the base salts.  Once they are combined transfer to a jar with a tight fitting lid.  

TO USE: Add 4 Tablespoons of salts while filling the tub.  You can also use 2 Tablespoons for a foot soak.

OPTIONAL: Add grapeseed oil to cover the salts once added to the jar and then scoop out one handful at a time in the bath or shower and use to scrub away the rough patches on elbows, knees and feet. Inhale the scents while you work to help soothe stress. Rinse thoroughly, both your and the shower to avoid falls.


Tuesday, October 13, 2020

End of Season Tool Care and Purchasing

Now is the time to shop for gardening tools.  They are on sale at season end and you can get them cheaper than in the Spring.  Here is a list of essential tools that you should own to get your gardening done with ease. It’s also a good beginner list of garden tools that will give you a great foundation to help create your beautiful garden.

Garden Spade or Shovel: You will certainly need a spade to dig up your beds or to plant a tree or bush. A round point spade is made to easily cut through the soil for planting. A shovel is necessary to dig and prepare large holes or entire beds for planting.


Garden Claw
: This tool is a fairly new addition to the garden tool family. It’s basically a long-handled cultivator. The garden claw is terrific for turning the soil and preparing beds with new soil. Soil needs to be aerated and the claw does a good job of this. This cultivator is great for mixing in fertilizers, compost, or new top soil into your existing bed.

Hand Trowel: A hand trowel is a mini spade that is used to plant small new plants and flowers. It’s ideal for working in tight spots in your garden and great for digging out those weeds!

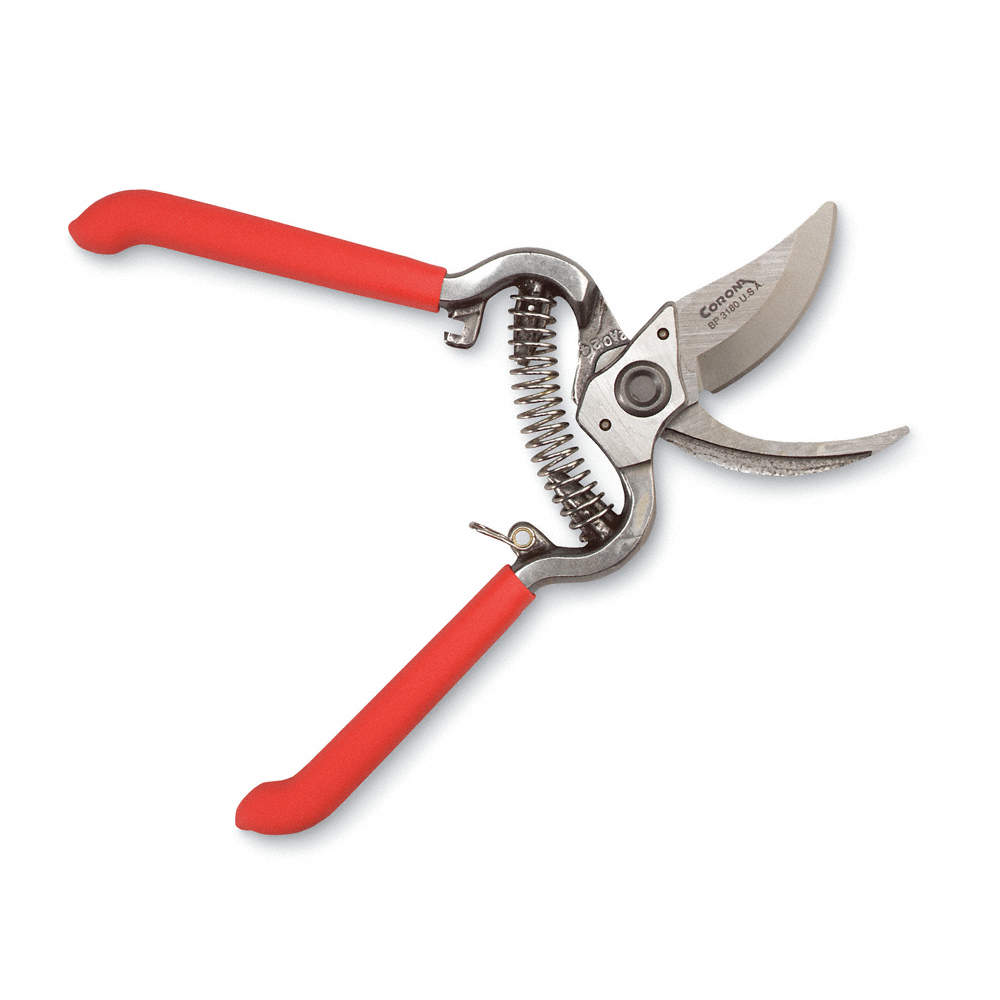
Bypass Pruners: Pruners are needed to keep your plants trim. Pruning plants actually encourages proper growth and keeps the plant from getting unruly and unsightly. Bypass pruners are used for new, soft growth on bushes and flowers. To trim large branches; long-handled loppers should be used. Shears, which resemble an extra-large pair of scissors, are good for trimming bushes, hedges and smaller branches.

Corona Bypass Pruners

Hose and Watering Can: With no water there is no garden! To water large areas you will need a hose and it is worth spending the money on a good quality rubber hose. Don’t forget a watering can for light watering of your new plantings or your display pots.

Rake: We need clean up tools after we finish our gardening! A rake is wonderful for getting all that debris off your lawn. Lawn and leaf rakes are perfect for this chore.

Broom: Yes, a broom does belong on this list. I don’t mean the brooms you use inside your house but a straw type broom to whisk up all the debris on your walkways and patio areas. I find my broom to be very useful when cleaning up, especially after I have been harvesting and laying bundles of herbs on my patio table.


WINTER TOOL CARE

If you already have your tools, remember to care for them properly when you put them away for winter. Before wintery weather arrives, don’t forget to protect and put away your valuable tools, too. 

Hand Tools: If you have rinsed off and dried your rakes, shovels, trowels, garden forks or other hand tools after each use, you won’t have to do much at the end of the season. But if they are dirty, don a pair of goggles before using a stiff-bristled brush to scrub off any mud or rust. Fine sandpaper or steel wool will take care of small, rusty spots. 

Sharpen any dull tools you use for digging or cutting and file down nicks. Wear heavy gloves to protect your hands while doing this. Don’t have the proper files or sharpening stones? Your local hardware store or garden center may be able to handle these chores for you. 

Next, gently run your hands down the wooden handles to check for cracks or splinters. A medium-grit emery cloth or a piece of sandpaper will smooth rough, weathered wood. Replace broken wood handles; tapes and glues don’t usually last. To remove a tool head from the handle, protect your eyes with safety goggles and strike the head with a ball-peen hammer. Never hit metal with a nail hammer, which can cause dangerous metal fragments to fly off. 

Coat the metal parts of your tools with light oil or spray them with a lubricant like WD-40 before putting them away. To protect the wooden handles, apply linseed oil. Hang your tools in a shed or garage, out of the weather, until you’re ready to use them again. If you prefer, keep small hand tools stashed in a bucket of sand mixed with oil; it will help guard against rust. 


Garden Sprayers: Wash your sprayers inside and out with soapy water, using a sponge or scrub brush. Spray some of the soapy mixture through the lines to clear them. Then rinse thoroughly with clean water, spraying again to flush the lines. Allow the sprayers to dry thoroughly before storing them out of the weather. While you're at it, store the chemicals you use in the sprayers away from freezing temperatures. 

Garden Hoses: Remove nozzles and drain the hoses. When they're dry, mend any leaks with electrical tape or garden hose repair tape. Replace the ends of hoses and washers, if needed. Coil the hoses to keep them from kinking and hang them out of the elements.

Thanks to HGTV for these end of season cleaning tips

Monday, February 3, 2014

Bath Item of the Month - Uplifting Bath Oil

February is the doldrums of winter.  The days are longer, but they are usually still cold and sometimes snowy and cloudy so we start to feel lethargic and depressed.  This no salt essential oil bath blend has two uses.  One the scent is uplifting to help rebuild your spirit during winter doldrums and without salt it will help to avoid additional drying of the skin from heated indoor conditions.

Uplifting Bath Oil
6 drops lemon oil
6 drops geranium oil
3 drops rosemary oil
3 drops peppermint oil
3 drops juniper oil

Use 8 drops into a tub of warm water and swish into the water.  Relax in the water and let your mind drift. Another use is to add the essential oils to a ¼ cup of almond or walnut oil before pouring into bath water. This will give additional protection to dry winter skin.

Tuesday, November 19, 2013

November gardening – Winter Mulch


One of the last steps to prep the garden for winter is to mulch the herb beds.  You must wait until after a good hard frost, which usually means in Zone 5, waiting until November.  Once you have a hard frost you can cut out dead stems of your chives, costmary, lovage, mint sorrel, tarragon and sweet cicely. Then apply a layer of mulch.  Do not do this too soon because you do not want to promote mold growth in the damp fall months or create homes for field mice or other little pests would borrow into the mulch.  Waiting until frost those pests have found other homes.  This is also a good time of year to test your soil pH content and if correcting is needed.  pH is a measure of the soil’s acidity to alkalinity.  Knowing the pH allows you to amend the soil to expand the range of plants a soil can support.  

Plants before the trim
Mulch
For winter mulch, I shred leaves, grass clippings, vegetable garden compost, pine chips, mixing in a bit of peat and lime for acidic areas.  By using this highly organic blend you add humus to the soil each year, and utilize the wastes from my property.

Hills covered with leaves


Here is a raised bed covered with grass

The silver maples along the back of the property gave mountains of leaves to use this way.  After years of doing this coupled with spring mulch of bark or peat, I ended up with a rich dark soil that is sweet and friable.


About pH
Herbs prefer a pH neutral to slightly above neutral soil, so if you tests come back below 6.5 pH sweeten it up.  That means adding lime and working it into the soil so it can do its work before spring.

To have your soil tested check with your local garden center, or purchase a test and do it yourself.  A mail-in test will provide more details and is probably worth doing, but in a pinch knowing the pH will help you to work with your soil.  pH test strips are similar to litmus paper that will change color based on the acidity or alkalinity of the soil.  They use a scale of 1 to 14 1 is acid, 14 is alkali, 7 is neutral.  Nutrients dissolve best when soil is 6.5 to 7.0 which will affect what plants will thrive.  When purchasing a test choose one that has 2 to 5 blocks of color for more accurate readings.

To test with a purchased kit, what you will get is a package of strips and a color chart for determining the results.

Steps for using:
1. Gather soil, remove organic matter, twigs from the top and dig down into the dirt.  You can collect and mix samples from various locations to get an overall pH.  Make you’re your digging tools are clean and not brass or galvanized as this will leave minerals in the soil.
2. Put 1 Tbls. soil in a glass bowl and add enough distilled water (not filtered) water to create a mixture with the consistence of a milk shake.  Stir well.
3. Leave mixture alone for one hour, but add water as needed to retain consistence.
4. Place a drop of the mixture on a test strip and wait one minute.
5. Rinse strip with distilled water.
6. Match test strip color with the accompanying color chart.

Thursday, January 17, 2013

What do Gardeners do in the Winter?

Freezing temperatures are not about to keep us from thinking green and nurturing plants.

Here are a few tips to keep your plants healthy and your thumb green throughout the winter months:

• Stay vigilant so snow and ice don't damage your outside plants. Gently brush off snow from heavily laden shrubs and trees to prevent breakage. Shovel or blow snow with care to avoid burying shrubs and perennials.

• Keep your garden tidy by continuing to remove broken or fallen branches. A few minutes of tidying now can save a lot of time in the spring and get you some winter exercise.


• If you need to remove ice from sidewalks or driveways, choose an environmentally friendly product that won't harm your plants. Most deicing products damage lawns, and granular fertilizers contaminate our waterways and the Bay. Instead, use sand or products containing magnesium chloride.


Tuesday, January 15, 2013

Indoor Crafty ideas for winter, How Tuesday

Terracotta Bird Feeder / Bird Bath

Make the outdoor animals happy and give yourself something fun to view.

Make a bird feeder from a terracotta pot.

These make good gifts too!

Using a plain colored terracotta pot with a tray, invert the pot and the tray.  Use the upside down pot as a base and the right side up tray on top of the pot bottom.  Super glue the tray onto the pot bottom. You can use any size you like.  Now using paints, stamps, or permanent markers, decorate the pot.  Fill it with seed to create a bird feeder.  In the summer fill it with water to be a bird bath.


Tortilla Snow Flakes

We have not had a snow storm of any consequence here in Chicagoland this year, much to my disappointment, so when I found this activity in files I just had to try it.  It is very fun to try with your kids.


All you need is a few flour tortillas, melted butter and colored sugar (or food coloring and white sugar)
    or for a more adult tasting treat use olive oil and a blend of dried herbs like thyme, savory, parsley and oregano


Fold the tortillas like you fold paper to make snowflakes.
Cut out all the little bits just like you would for paper snowflakes.
Then open them up.
Place them on a baking sheet and paint with melted butter.  Sprinkle on colored sugar and bake for a few minutes. It's a great snack and a craft in one!


Scented Stones
I tried these with the Girl Scouts a few years ago and they were a big hit.
1 ½ cups white flour
¼ cup salt
¼ tsp cornstarch
2/3 cup distilled water, brought to a boil
1 Tbls essential oil or fragrance oil (any scent you want or make smaller batches and use multiple scents.)
2 tsp dried herbs if desired

Mix all the ingredients together in a disposable container until a dough forms.  Roll the dough into balls about the size of a large marble.  Flatten them with your fingers to look like pebbles and rocks. 


They must be allowed to dry very thoroughly.  If you are not sure if they are dry spread on parchment paper on a baking sheet and set in low oven 200 degrees for several hours.  Once they are dry place a few pebbles in a terracotta tray with a few dried herbs or leaves and pine cones for a decorative display.

Using dried herbs in the blend will give them a more earthy coloring.


Tuesday, January 8, 2013

Winter Blahs - Quick cures

Now that the holiday season is over, but the days are still so short, it is easy to feel a bit lackluster in energy.  I thought I would share a few quick and easy recipes that will help you improve your mood and energy as the winter months drag on.  I did a post last winter about this same time detailing some of the herbs that will lift spirits in winter.  Check it out with this link.

Enjoying the Cold
This recipe I found in the Essential Herbal Magazine December 2012 edition.  Michael Blackmore wrote an article about making herbal ice pops.  One of his suggestions was a blend of heart healthy and uplifting herbs he called Happy Heart.  Here is how he made it.

1 1/2 cups boiling water
2 ounces of lavender buds
2 ounces rose hips
1 ounce hawthorn berries
1/2 cup honey

In a pint-sized mason jar combine the herbs and berries and allow to steep for several hours.  Filter out the herbs from the water, placing the liquid in a measuring cup.  Add the honey and stir until dissolved.  Pour the result into molds, leaving head space for expansion.  Freeze for several hours (between 2 and 6 depending on the freezer.)

Using Aromatherapy

Another way to lift spirits is with scents.  This combination of essential oils can be used in salves, lotions, room sprays or scent infusers.  Combine the following oils in a jar and shake well.  Then add by drop to terra cotta infusers or other scent holding items.  This is may favorite blend as it citrus base adds a ray of sunshine:

5 drops of Lemon Essential Oil
5 drops of Orange Essential Oil
3 drops of Geranium Essential Oil (I use Lemon geranium)
2 drops of Peppermint Essential Oil

Monday, March 12, 2012

Winter Sowing


I am attending the Chicago Flower and Garden Show this weekend and next week will be sharing gardening ideas I picked up or improved learning there.  To get you in the mood, I thought I would share an idea I have been toying with and finally decided to accomplish.  If there are no pictures with this post, please bear with me, I am having some trouble with the computer recognizing the .jpgs  I will post photos as soone as it allows me too!

Winter sowing is an easy germination method that allows you to start hardy seedlings for pennies.  Winter sowing is done outdoors during winter using mini-greenhouses made out of recyclables.  There is no heating devices, no energy using grow lights and nothing very expensive at all to start your seeds.

The best source on the internet for winter sowing tips and guidelines is www.wintersown.org by Trudi Davidoff.  On that site you can identify what can be winter sown or if you should just save the seed and direct sow it in the garden.

This is a great green project for recycling old milk jugs and toilet paper rolls, yet you can get a bit of dirt under your finger nails when it is hard to do that outside in Illinois just yet.

What you need:

Sharp scissors or a knife
Milk cartons, gallon size or paper towel tubes and a card board box
Seed packets
Waterproof marker
Water
A roll of duct tape
Potting soil
Outdoor location to place your planted seeds

Steps:

Place the tubes in a small cardboard box spaced so they touch each other and do not fall over.

Or poke holes in the bottom of a one gallon milk carton.  Then using sharp scissors cut the carton all the way around by the handle, leaving the handle intact.  This will leave a hinge for opening the milk jug.

Add the potting soil to the milk jugs or paper towel rolls.  It does not need to be very deep about 1 ½ to 2 inches at most.  Label the milk jug or writ on the inside edge of the towel rolls the name of the seed you will be planting.  You can put a label on the bottom of your milk jug too in case the other falls off.

Give the soil a good watering before placing your seeds.  This will keep them from floating away when watered after.  I watered the milk jug before I planted and the towel rolls after I planted them. 

Remember to plant the seeds at the depth specified on the seed packet.  Pat the soil down or add a layer of soil on top of the seed instead of pressing them in.

You need to have 2 inches above the soil to allow space for seedlings to grow.

Secure the sides of your cut milk jug with duct tape and place it in the snow outside or on a picnic table, sidewalk ledge or balcony.

I put plastic wrap, double thickness over the top of the cardboard box.  To give the greenhouse effect I need to get the seeds to start.

Herb seeds I recommend for winter sowing:
Calendula
Viola
Flax
Basil
Mint
Oregano
Parsley
Sage
Thyme
Dill
Hyssop
Marjoram
Chamomile
Chives
Yarrow


UPDATE: we actually planted a variety of herbs in winter sowing containers in 2014.  Here is a step by step

Thursday, January 5, 2012

Winter Skin Remedies

Recently I was researching a few new recipes to try out for a program called Winter Skin Recovery, that  I will be presenting at the Wauconda Area Public Library in February.   They wanted a Bath and Beauty program with an emphasis on dry skin formulas since it will be happening in the middle of dry skin season.  I wanted to include a few new recipes so I have been experimenting and researching and now that the heat is on and my skin is drying out it is a useful experiment. 
One of the recipes I am testing is a cleanser using Lavender and Rose.  Rose if very softening and Lavender is a gentle antiseptic so as a skin cleanser they are a good combination.  Since this is not made with soap, it eliminates the drying effect soap can have.  You actually make the blend and leave it dry, adding liquid just before you use it.  That gives you a 3 to 6 month shelf life and the ability to keep from wasting it.
Here is the recipe for you to try too!  Let me know if you enjoy it.
Lavender and Rose Cleanser
½ cup white clay, finely ground
1/3 cup ground oatmeal or oat flour
1 Tbls. Powdered lavender flowers
1 Tbls. Powdered rose petals
5 drops lavender essential oil
2 drop rose geranium essential oil

Mix dry ingredients, add essential oils and mix carefully and completely.  Store in a zip seal bag or tightly lidded jar.
Directions for use: Place 2 teaspoons of powdered cleanser into a small bowl or the palm of your hand and add 2 tsp. of water, milk or cream.  Stir to blend until a spreadable paste forms.  Allow this paste to thicken for 1 minute.  Using a soft cloth, cleansing pad or your fingers, apply entire mixture to cover face, throat and upper chest (avoiding eye areas) and massage in a circular motion for 1 minute.  Rinse.
You can also use this as a face mask by spreading it on cleansed skin and letting it dry for 20 minutes before removing.
Although this is a bath theme post, I just wanted to remind everyone that there is a SOUP MIX sale going on in our Etsy Store.  Use the code JANSALE25 to get 25% off all out Soup Mixes.

Monday, November 21, 2011

Making Holiday Gifts Series - Winter Skin Care

Today's descriptions and suggestions are for simple gifts to care for your skin in winter.  A perfect selection of items you can give in a gift basket to a close friend or anyone who lives in the northern tundra!

Always keep in mind that when crafting items for the skin you need to use cleansing and exfoliating herbs.  You cleanse with herbs that contain foaming saponins, like oats and yucca as well as anti microbial herbs like thyme and sage.  To exfoliate you need abrasives.  You can use ground peach or date pits, but I prefer powdered parsley which is less harsh and has some naturally occurring acid for exfoliation.  Chamomile and lemon also contain good acids for this.

Skin Softening Wash Bag

This cleansing bag has just was you need to soften and scrub.

8-inch square muslin fabric
¼ cup ground oatmeal
¼ cup ground sunflower seeds

Place ingredients in center of cloth and tie closed with yarn or ribbon.  Gather into a pouch.  As you relax in the tub, rub your entire body with the bag, then let it remain in the water releasing its softening properties.  Discard bag when finished.

You can enhance this recipe by adding Chamomile or Scented geranium leaves to the mixture in the bag. 

Chamomile – Tones all types of complexions. The anti-inflammatory effect of this essential oil applied topically improves skin regeneration, and a cold compress does wonders for puffy eyes. Chamomile is used in facial steams to reduce puffiness and cleanse the pores of the skin.

Geranium – Wonderful oil for mature and troubled skin and brings a radiant glow and promotes circulation.

Rosewater

Rose water in addition to being an ingredient in many skin treatments is by itself a great item to use and this simple recipe will allow you to make your own.

If you do not have time to distill your own rosewater, you can create rosewater, using a much simpler method.  Your water may not be a fragrant as the distilled method, but the results are very pleasant and you can use the mild rose scented liquid as a light fragrance, after-bath splash or skin toner.  It also makes a nice addition to homemade creams and lotions.

Quick Rosewater
1 cup firmly packed rose petals, washed
2 cups boiling water

Place rose petals in a ceramic or glass bowl.  Use only fresh petals (no leaves or stems).  Pour boiling water over petals, and allow to steep until cool.  Strain off the petals and pour the scented liquid into a clean bottle.

Rose – Astringent and luxurious, rose oils and rose waters are welcome additions to almost any skin care formulation has an astringent effect on oily skin, reducing puffiness, edema and has a slight tightening effect. The oil most effective for moisturizing and hydrating the skin while having a general stimulant and antiseptic action which is good for all skin types, but especially so for dry, mature and irritated skin. It is used to repair broken capillaries, inflammation, as well as skin redness and is useful in eczema


Bath Tub Tea
A bath tub tea can help with exfoliation and the removal of agents that dry skin.  You can include a lemon in the basket and a 2-3 peppermint tea bags with the following instructions to use in the tub as well:
                                      Use these items to produce a Lemon Mint Herbal Bath Tea. 
                                      Prepare the bags of peppermint tea and slice the lemon. 
                                      Add the liquid from the tea to the bath water and float the
                                      lemon slices. Crawl into the water and soak for at least 15
                                      minutes.  Pat do not rub your skin to dry!

If you are in a hurry, you can also get some great Bath Salts, Scrubs and Tub Teas from the Backyard Patch and put them into a basket too!  Check out our choose your own basket items on Etsy.

Related Posts Plugin for WordPress, Blogger...