Thursday, September 24, 2015

Back in the groove - Herbs for Fall

We have finally finished moving.  I have the internet at home now for the first time in over a decade. And it is a good thing, because I am not working outside the home as much as before.  I am going to be spending my time growing the herb business!  Something I have wanted to do, but have not had the hours needed for such a long time.

Harvest was good this year, as water has been plentiful and flooding not an issue for a change. Here a a few shots of the inside and outside of the new shed.  Now I have two sheds.  One at the property and one at home so I can harvest twice as much on a work day.  This will be good int he long run because the more you harvest the more grows back!!


Since it is harvesting season, I thought I would share a few harvesting and preserving links from posts past as I gear back up to posting more regularly.

Happy harvesting!

Here is a post on Drying the Harvest

This one is an overview of of the technique of hang drying.

This one details how to make herb pastes - the best way to preserve the fresh basil flavor.

Of you can just Freeze the herbs too!

Friday, September 4, 2015

Herb Scented Bath Jelly - Monthly Bath Blend

It is canning time and my thoughts turn to making herbal jellies.  You can check out my how to on Purple Basil Jelly here if your thoughts are going there too!  But in keeping with these thoughts I found a great recipe for a Bath Jelly.

Jellies can be made as a luxurious adult home spa goody or they can be packaged for the kids (set with toys inside). They make great gifts. They may not bubble up as nicely as some commercial products, but definitely a nice treat.

Herb Scented Bath Jelly

1 envelope unflavored gelatin
1/2 cup liquid soap (unscented–shower gel, hand soap or bubble bath)
Essential oil (choose a favorite, use just a few drops)

Directions:
Bring 3/4 cup water to a boil, remove from heat then slowly dissolve the gelatin. Slowly pour in liquid soap and stir. Add essential oil, combine well.  Pour liquid into a clean clear jar or container, seal and refrigerate overnight.  Once it gels, it’s ready. This is not a long term recipe, it will keep for a few weeks if refrigerated and sealed airtight to avoid mold, but not much longer.

Optional: A couple drops of food coloring can be added when first mixing jelly to give it some color, don’t use too much though since it can stain tubs.

To Use:
Just put a spoonful under running tap for a bubbling treat (a tablespoon or two will do).
If you wish, skip the essential oil and use liquid soaps that have a fragrance.


Tuesday, August 4, 2015

Monthly Bath Recipe - Green Tea Bath Salts

Adding green tea to your bath salts can add a “zen” theme to your bath.  The antioxidant rich qualities of green tea will enhance your skin with anti-aging benefits. Add some quiet moments of meditation or reflection in the bath for a deeply relaxing experience!


Green tea can be purchased in bulk, or by tearing open tea bags. The Epsom salts can be obtained in the pharmacy section and sea salt from the cooking section of the store.

I used food coloring to color half of the salts green, though this part is optional.  To avoid having tea leaves stuck to the tub, I suggest placing the mixture in a bag or square of cloth before using.

You can find muslin bags at a health food or craft store, along with the jasmine essential oil. 

Green Tea Bath Salts  
1 cup Epsom salts
1 cup Sea salts
1 cup baking soda
1/2 cup bulk green tea, or green tea powder
12-20 drops jasmine essential oil
5-8 drops green food coloring (optional)

Mix well and store in an airtight container. Keep in a cool, dark place, as sunlight can degrade essential oil.

To USE:
Use 1 cup per bath. Add to running hot water to dissolve.  Sit back and become “one” with the bath!

An alternate way to prepare this bath is to brew 3 or 4 green tea bags in a pot. After 10-15 min, add directly to the bathwater, along with the salts and jasmine.


Saturday, August 1, 2015

Breads for Lammas Day - Weekend Recipe

The Celts were great about celebrating seasonal and celestial time periods.  They marked many of these days with a celebration.  August first is the festival of Lughnasadh (Loo-na-sa) it was a celebration of the first loaves of bread from the new harvest.  To commemorate this festival I am sharing a couple of herb bread recipes.

Make them and enjoy your Loaf Mass!

RECIPES

Summer Herb Quick Bread
Adapted from "The Provence Cookbook" by Patricia Wells

1 cup flour
2 tsp baking powder
1/2 tsp fine sea salt
3 eggs, lightly beaten
1 cup plain yogurt
2 Tbls. imported French mustard
1/2 cup Swiss Gruyere cheese, grated
1/4 cup mint, minced
1/4 cup chives, minced
1/4 cup thyme, minced

Directions:
Preheat the oven to 425F. In a food processor or blender, combine flour, baking powder, salt, eggs, yogurt and mustard; add cheese and herbs. Pour batter into bread pan and bake in the center of the oven for 45 minutes or until firm and golden. Remove pan from oven and invert onto a cooling rack.  Makes 1 loaf or about 12 slices.  It will keep if stored in a zipseal bag at room temp for about 3 days.


Oregano Herb Standard Bread

1 pkg. Active dry yeast
5 ¼ cups all-purpose flour
2 ½ cups shredded sharp cheddar cheese
1 ¾ cup milk
3 T. salad oil
2 T sugar
2 T minced Oregano
1 t. salt

Stir together the yeast and 2 cups of flour. Heat together all the remaining ingredients except the flour, until lukewarm. Add to flour-yeast mixture and beat on low speed for 30 seconds, followed by 3 minutes on high speed slowly stirring in flour as much as can with a spoon.

Now knead in the remaining flour to make a stiff dough for about 8-9 minutes. Shape into a ball and put in lightly greased pan/bowl, turning once to grease all sides of surface. Cover and let rise for approximately 1 hour or so until the dough mixture is approximately double in size. Punch down dough and divide in half, cover and let sit for 10 more minutes. Shape into 2 loaves and place into buttered 8 x 4" loaf pans. Cover and let rise another 45 minutes Bake in 350 F for 40- 45 minutes and cover with foil last few minutes to prevent over-browning.

Herb Sourdough Bread

If you have a sourdough starter this is a great herb bread you can craft with it.  Try it if you can get some.

1 cup sourdough culture
1 Tbls. butter
1 cup milk
1 tsp salt
1 tsp sugar
½ tsp dried thyme
½ tsp dried oregano
½ tsp crushed dried basil
3 ½ cups unbleached all-purpose flour

Dough Proof
Pour the culture into a mixing bowl. Melt the butter and add the milk to warm. Stir in the salt, sugar, thyme, oregano, and basil and stir. Add the butter mixture to the culture and mix well. Add the flour a cup at a time until the dough becomes too stiff to mix by hand. Turn out onto a floured board and knead in the remaining flour until the dough is smooth and satiny.
Or mix and knead all of the ingredients for a maximum of 25 minutes in a bread machine or other mixer.

Proof the dough overnight (8 to 12 hours) at room temperature, about 70°F, in a large bowl covered with plastic wrap (or leave in the machine pan, removed from the machine, securing the plastic wrap with a rubber band). During this time, the dough should double in size in the covered bowl, or rise to the top of the machine pan. After the proof, use a spatula to gently ease the dough out onto a floured board. Allow the dough to rest for 30 minutes. If marked flattening occurs during this time, knead in additional flour before shaping.

Loaf Proof
After the 30-minute rest, shape the dough. Flatten it slightly, then lift a portion from the periphery and pull it toward the center. Continue this around the dough mass to form a rough ball, then pat and pull into the loaf shape you desire. Place on a baking sheet or in a bread pan and proof for 2 to 4 hours, until it doubles in bulk or rises nearly to the top of the pan. Proof for the first hour at room temperature and then at 85° to 90°F in a proofing box.

Baking
Place the pan with its shaped, proofed loaf in a cool oven, then turn the temperature to 375 degrees Fahrenheit and bake for 70 minutes. Or transfer the loaf to a preheated baking stone in a 450°F oven and bake for 40 minutes. When the loaf is baked, remove it from the pan and let cool on a wire rack for at least 15 to 20 minutes before slicing.


Thursday, July 9, 2015

Comfrey as a Fertilizer

Comfrey is an invaluable plant in the herb garden.  (Around here we call it Indian boneset.)  In addition to the medicinal and cosmetic uses. It is a plant containing all the nutrients necessary for healthy plant growth in a digestible form.   It has a high potash content and is also a source of nitrogen, phosphorus and other elements.


As such you can use it as a fertilizer in all of the following ways:

As a mulch, by spreading freshly cut Comfrey leaves round plants (Black currents and fruit bushes especially benefit from this treatment).  Laying a topping of grass clippings adds bulk and accelerates the decay and release of nutrients.

Add Comfrey leaves to the compost heap in thin layers between other compost.  It will work as an activator encouraging the breakdown of other plant material.  Avoid the roots in this mixture or they will regenerate and sprout new plants.


Fill a bucket halfway with comfrey leaves and cover with water to create a liquid fertilizer.  It needs to steep for 4 to 5 weeks covered.  Strain off the liquid (beware it will be smelly) and use it undiluted as an organic fertilizer for container plants, tomatoes and general garden use.

Sunday, July 5, 2015

Foaming Bath - Monthly Bath Blend

This blend is good in the bath or shower.  Make the recipe and place in a pump bottle in the shower or use in a filled tub.  You will need about ½ cup per bath, but a pump or two in a bath puff will give you a luxurious shower.

Foaming Vanilla Bath
1 cup sweet almond oil (light olive or sesame oil may be substituted)
1/2 cup honey
1/2 cup liquid soap
1 Tbls. vanilla extract

Measure the oil into a medium bowl, then carefully stir in remaining ingredients until fully blended. Pour into a clean plastic bottle with a tight-fitting lid. Shake gently before using. Enough for four large luxurious baths.

To Use:
Swirl about ½ cup into the tub under running water – then step in and descend into a warm, silky escape.


In the shower - Place a squirt or two into a damp bath puff and rub it into a lather then use to scrub the body.

Wednesday, June 17, 2015

Herb of the Week - Culantro

No I did not spell that wrong, I really mean that we are highlighting 
CULANTRO (Ergyngium foetidum) as the Herb of the Week.


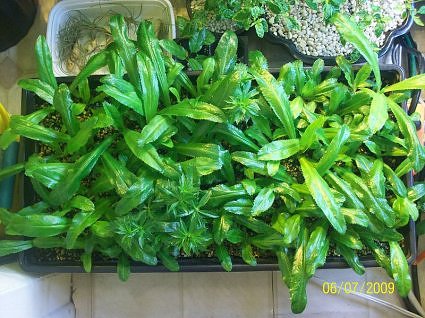
Culantro is not cilantro. It has long leaves with tapered tips and serrated edges. When it comes to flavor, culantro is like cilantro, times ten.

In warmer climates, above Zone 7, the actual cilantro plant can be reseeded and grown commercially, harvesting the leaves as they appear. In zone 7 and below the climate is seasonally ideal for Cilantro so many people buy the plant expecting it to bear leaves for an extended period, but it will not. The reason is true cilantro, in heat, is working to expend it's energies to go to seed, coriander. Leaves are herbs, seeds are spices as a general rule in understanding the difference between the two.

Richard Jung /Getty Images

The solution to a perennial heat bearing cilantro is to plant, Culantro - Ergyngium foetidum. Culantro is a biennial herb grown throughout the Caribbean and Central America, and is a key ingredient in Puerto Rican cooking. It is relatively unknown in the United States, and is often mistaken for its relative cilantro (Coriandrum sativum L.). It is also known by many other names, such as Puerto Rican coriander, Black Benny, saw leaf herb, Mexican coriander, Saw tooth coriander, long coriander, Spiny coriander, Fitweed, and spiritweed. In Puerto Rico it is known as recao. 

It belongs to the same plant family as cilantro, but looks quite different. The long, tough leaves smell very similar to cilantro (with much more flavor) thus making it a respectable summer substitute for cilantro, which prefers cooler weather.
  
Unlike cilantro, culantro doesn't bolt, it will produce seeds, but the foliage stays aromatic and tasty. It is a tender perennial that can be wintered over in a pot or cut back and mulch over in the fall.

Culantro is the answer for those who enjoy cilantro but live in a hot/warm climate and want fresh all spring/summer and fall.

To Grow

Culantro can be planted in pots or on the ground. If planted in the ground, this herb will continue to reproduce for an almost endless supply. Culantro is relatively pest and disease free. It is rumored to be attractive to beneficial insects such as ladybugs, green lacewings, and to provide an excellent defense in the garden against aphids. 

Growing culantro is like growing lettuce. You plant after frost in the spring, then pick individual leaves until summer’s long days and high temperatures arrive. At that point, culantro, like lettuce, will grow out of its rosette, stretching upward with a fast-growing stalk that will bloom and set seeds. Soon afterward, the plant is usually exhausted and dies. If the seeds are allowed to drop into the soil, it may reseed. However, in areas that experience freezing temperatures in winter, this tender tropical will be killed. Your best bet is to grow it in spring and cut off the flower stalk when it appears in order to encourage continued leafy growth, rather than flowers. It will eventually succeed in flowering, and when it does, the leaves will become somewhat tough and less appealing.

When cultivated, culantro thrives under well-watered, shady conditions. Grown as an annual, it is actually biennial in areas warm enough to let it overwinter.

To Use

In cooking it is used to flavor salsa, softrito, chutney, ceviche, sauces, rice, stews, and soups. To harvest, remove the oldest leaves all the way down to the base of the plant leaving the young new leaves to grow. The leaves can be chopped and used fresh or frozen to keep their flavor.

The appearance of culantro and cilantro are different but the leaf aromas are similar, although culantro is more pungent. Because of this aroma similarity the leaves are used interchangeably in many food preparations and is the major reason for the misnaming of one herb for the other. While relatively new to American cuisine, culantro has long been used in the Far East, Latin America, and the Caribbean. In Asia, culantro is most popular in Thailand, Malaysia, and Singapore where it is commonly used with or in lieu of cilantro and topped over soups, noodle dishes, and curries. In Latin America, culantro is mostly associated with the cooking style of Puerto Rico, where recipes common to all Latin countries are enhanced with culantro. The most popular and ubiquitous example is salsa, a spicy sauce prepared from tomatoes, garlic, onion, lemon juice, with liberal amounts of chiles. These constituents are fried and simmered together, mixed to a smooth paste and spiced with fresh herbs including culantro.

sofrito
Equally popular is sofrito or recaito, the name given to the mixture of seasonings containing culantro and widely used in rice, stews, and soups. There are reportedly as many variations of the recipe as there are cooks in Puerto Rico but basically sofrito consists of garlic, onion, green pepper, small mild peppers, and both cilantro and culantro leaves. Ingredients are blended and can then be refrigerated for months. Sofrito is itself the major ingredient in a host of other recipes including eggplant pasta sauce, cilantro garlic butter, cilantro pesto, pineapple salsa, and gazpacho with herb yogurt.

Culantro is rich in iron, carotene, riboflavin and calcium. This plant is widely used as food flavoring and seasoning herb for dishes and chutney in the Caribbean; it is popular in Asia for food use. And to use cilantro solely as a substitute for culantro in your sofrito will only result in an inferior, soulless green paste with no Caribbean whoomph! 

The culantro plant is used in traditional medicines for fevers and chills, vomiting, diarrhea, and in Jamaica for colds and convulsions in children.  The leaves and roots are boiled and the water drunk for pneumonia, flu, diabetes, constipation, and malaria fever. The root can be eaten raw for scorpion stings and in India the root is reportedly used to alleviate stomach pains. The leaves themselves can be eaten in the form of a chutney as an appetite stimulant.

Recipes

Sofrito is a versatile, aromatic mixture of herbs and vegetables used as the foundation for many Latin Caribbean dishes. There are many variations of this recipe. If you wish to prepare your sofrito with ingredients that are easy to find in any grocery store try the basic sofrito recipe. Store sofrito in a glass container in the refrigerator for immediate use or freeze sofrito in 1/4 to 1/2 cup portions for use at any time.

Basic Sofrito
2 medium green peppers, seeds removed
1 red sweet pepper, seeds removed
2 large tomatoes
2 medium onions, peeled
1 head of garlic, peeled
1 bunch cilantro leaves
1/2 bunch parsley leaves

Directions:
Chop and blend all the ingredients in a food processor or blender.

In the recipe below ajíces dulces (also called cachucha or ajicitos) are small sweet peppers with a hint of spice. They look very similar to habaneros, but aren't spicy.

Special Sofrito

2 medium Cubanelle peppers, seeds removed
4 to 6 ajíces dulces, seeds removed
1 red sweet pepper, seeds removed
2 large tomatoes
2 medium onions, peeled
1 head of garlic, peeled
1 bunch cilantro leaves
4 culantro leaves

Directions:
Chop and blend all the ingredients in a food processor or blender.

Green Rice
2 tablespoons oil
1/2 medium onion, finely chopped
1 jalapeno chile pepper, seeded and minced
1 teaspoon minced garlic
1 teaspoon ground cumin
1/2 teaspoon salt
1/4 cup chopped fresh culantro
1/4 cup chopped fresh parsely
2 cups chicken broth
1 cup long-grain white rice

Directions:
 Heat 1 tablespoon of oil in a large, heavy skillet over medium-high heat. Add the onion and jalapeno and saute until softened, about 3 minutes. Add the garlic, cumin, salt, culantro, and parsley and cook, stirring, for 30 seconds. Remove from the heat and transfer to a blender with 1/2 cup of broth. Blend until smooth and set aside. Heat the remaining 1 tablespoon oil in the skillet over medium heat. Add the rice and cook, stirring, until translucent, 1 to 2 minutes. Add the herb puree and cook, stirring, to evaporate most of the liquid, about 2 to 3 minutes. Add the remaining 1 1/2 cups broth, stir, cover, an reduce the heat to medium-low. Simmer, without stirring, until the rice is tender and the liquid is absorbed, about 20 minutes. Remove from the heat and let sit, covered, for 10 to 15 minutes. Fluff with a fork and serve, garnished with additional cilantro.
Related Posts Plugin for WordPress, Blogger...