Showing posts with label decorating. Show all posts

Tuesday, December 10, 2019

How Tuesday - Making ornaments with pine cones

In November I taught a class on making decorations with pinecones.


We painted them, tied them into garlands and attached them to ribbon to create swags.  We also made a few fun decorative crafts and ornaments with the pinecones as well.  I thought I would do a HOW TO on making these fun decorations.


My Christmas tree is decorated in pine cone ornaments.  Many are glass, but a large number are real pine cones, so making ornaments for my tree this year was extra fun for me.

Pinecone Reindeer
1 Pine cone
2 Felt ears
2 Twigs
2 Googly eyes
1 Red bells for nose
Tacky glue/hot glue
Patterns for felt parts

 Step 1: Cut felt pieces to make two ears. They need to be leaf shaped, about 1 inch to 1 1/2 inches long. 

Pinch one end of the ear and glue into the pinecone near the wide end with hot glue. 

Step 2: Take two twigs and glue with hot glue closer to the top of the wide end, to the back side, above the ears.  

Step 3: Glue two googly eyes about mid-way on the pinecone.  

Step 4: Add the red bell to the pointed end as a nose. 

Step 5: Add a hanger to top, if desired. 
Step 6: Set aside to dry.

Pine cone Snowflake Ornament
5 mini cones
2 Foam snowflakes
Hot Glue
Jute for hanger 5 inches long


Step 1: Take 5 mini cones and using hot glue, 

 glue the cones together at the wide base, points pointing out,


to form a star/snowflake shape. 

Step 2: Add a jute hanger, if desired, by tying through the center hole.

Step 3: Place a foam snowflake on both sides in the middle of the star shape over the middle and glue in place. 


Step 4:  Allow to dry before hanging on your tree.

Later this month I will show you how to make a cool dry snow globe.

Tuesday, November 20, 2018

Succulents for Holiday Decorating


Today is the last day to enter the Cash for Christmas gift card giveaway-- 

   If you missed the post earlier this month check it out here:

Succulents for the Holiday

This year succulents are all the rage for the holidays.  You can use them as a table decoration.

This is from a great Etsy shop with wonderful succulent wreaths
This is the Thanksgiving arrangement I made at the Garden Club meeting just a week ago.  We will be using it as a Hostess gift as we are having a Friendsgiving celebration this year!


Garden Club memebers each made our own arrangements and they looked amazingly cool!

You can use succulents to make a Christmas tree, by covering a foam cone with moss and chicken wire, or cutting floral foam into a cone as the base into which one pokes the succulent stems.


On WGN I saw a decorated tree where they put living succulents in little pots into a faux tree and it was an amazing effect.  I think I will be trying it myself.  Using succulents in Holiday Tree decorations was made that into a decorating challenge back in 2014 at  DIYSHOWOFF.com where you can see how they meld wonderfully in a natural scene.  I think they will look great with my pine cone tree decoration theme.


Care of Succulents
The best part of using succulents indoors in winter is that they are mostly dormant and do not mind the dry weather of a heated home.  Don't over water them.  Only about once a month is needed in winter and only if the leaves start to show some withering meaning they have exhausted the soil moisture and the water reserve in their leaves.  No more frequently than every two weeks is recommended, just make sure the soil is completely dry before you wet it again.  A sunny location is perfect, but they do not need direct sunlight.

Monday, December 1, 2014

Advent How to - Scented Pine Cones

For 2014 we have decided a two fold Advent Calendar.  On the Backyard Patch Facebook Page we are posting a recipe a day beginning November 30 and continuing through Christmas Day.  Each week will be a different theme.  This week it is appetizers.  Stop over there around 6 pm everyday for the new recipe.

On the Blog we have decided to share a weekly HOW TO.  Each we will have a recipe, gift or decorating item to enhance you holiday and give you a moment to reflect.

Taken in Wisconsin, beautiful Hore Frost

I first shared this recipe in November 2010 on my blog. This year I mentioned that I wanted to make these as gifts and that I needed pine cones and suddenly people are sharing pine cones with me left and right.  I am loving it and made my first batch of scented pine cones last week. I have placed them in a bowl in my entry hallway and what a wonderful scent they have!


Before you make this recipe, I should warn you that if you collect pine cones outside there is a treatment you need to do before you can scent them.  It is quick and easy, but a must!  Place a sheet of parchment on an old cookie sheet.  Spread the cones over the sheet in a single layer and place in a 200 degree oven for 60 minutes. This will remove much of the pitch and all of the bugs.


Once you craft these they can be placed in a trifle bowl and used as a centerpiece. They also look great stacked in a basket on the mantle.  From there you can even toss them into the fire for a crackle and scent.  I have also placed them in a burlap bag just to give off the scent from under my tree.  This is especially good if your cones are less attractive or have broken and smashed side.  Then I know I am going to do this, I do not even worry about collecting "only the good ones!"

So let's get to the task.  Once you have baked the pine cones you are ready to mix.
I let the cones cool thoroughly, leaving them on the parchment paper which allows the pitch to continue dripping out.

Step One - Cool the cones completely.  

Notice how they open up after being in the oven enhancing their attractiveness.


Step Two -   Mix the essential oils with orris root or arrowroot flour in a jar, shaking well to blend. Set aside. I used a bit of clove, rosemary, clove and sweet orange (about 5 drops each) and those called for in the recipe.

Step Three - Combine the herbs and spices in a zip lock bag.

Step Four - Add the pine comes to the bag.  About 10 to 15 depending on size, but I generally fill the bag.

Step Five - Add the scented powder to the bag and shake vigorously.


Step Six - Using as much patience as possible, allow the pine cones to meld in the bag for a week or so.

Step Seven - Decorate with them, hang them on your door wreath, or wrap them in cellophane to give as gifts, especially to those you know with a fireplace.


Scented Pine Cones
      2 Tbls. orange peel
      1 Tbls. cinnamon pieces
      1 Tbls. Hibiscus flowers
      1 tsp. broken bay leaves
      1 1 /2 Tbls. orrris root
      10 drops cinnamon oil
      10 drops bergamot oil
      10 to 15 drops any other spice oils of your choice
      10 to 15 pine cones


Mix together the essential oils with the orris root (use arrowroot flour if you are sensitive to orris.)  Blend the herbs and spices together with the pine cones in a zip seal bag.  Add the scented powder and shake to cover.  Allow to meld as long as a week in the bag before using.

Enjoy the scents of the season and have fun this winter!

Come back next Monday for another Advent How TO!

Friday, November 14, 2014

Easy ways to dress up a Holiday Event

I am traveling around the holidays this year, but in between I still intend to have a party at my place and perhaps do some decorating., so as result I am dusting off my information on Prepping for the Holidays and I thought I would start with a few easy items.  How to dress things up and give a Holiday flair.


Food Presentation

Before slicing a cucumber, run the prongs of a fork down the length of the sides at intervals.  The slices will then have a fluted edge.

Make radish spinner garnishes.  Trim off the top and bottom of a radish.  Then cut two 1/8” thick slices.  Cut reach slice from the center to the outside gently push the two slices together where they have been out as a right angle to form a spinner.

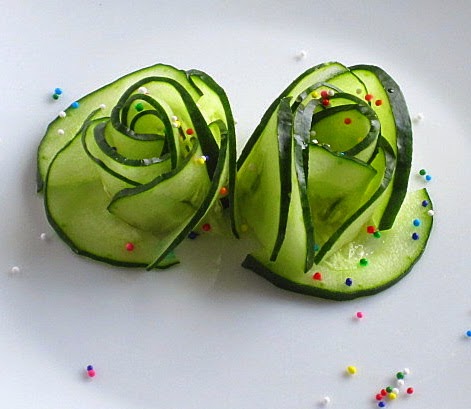
Craft a cucumber blossom.  Peel long, thin strips from a cucumber.  Boil strips for 3 minutes.  Remove and cool.  Cut ¼ inch wide slits in the center of strip, being careful not to cut through the edges.  Gently wind strip into circles forming a flower.  Secure with a toothpick. 

Serve your dips in a hollowed out pumpkin or colored cabbage.  Use red and green peppers on your Christmas table.  Fill each vegetable with dip.  Line the inside with plastic wrap before adding the dip.

Create a cucumber spring.  Chop cucumber into 3 inch pieces.  Poke a wooden chopstick into the knife hits the chopstick.  Continue turning and cutting around the cucumber.  Remove the chopstick and gently pull the ends to form a spring.

For extra fancy veggies use a crinkle cut knife or madeline blade to chop carrots rounds, cucumbers and even pepper rings.

Garnish with strawberry fans.  To make, start at the tip and cut the strawberry into thin slices with out cutting through the end.  Spread slices open to form a fan.

To make a tomato rose garnish you need a large tomatoes and a serrated knife.  Stating at the bottom end of the tomato use the knife to saw off a continuous strip of tomato skin about ½ inch wide around and around the tomato.  Carefully roll this strip into a tight coil, then let open up slightly to create a blossom.

Make Carrot/Cucumber rings.  Cut cucumbers into 3 inch lengths, hollow out the seeds and insert a carrot into the center, then slice the combo into ½ inch slices.

Table Dressing


Do you have fall leaves or pine cones on the lawn?  Bring them in and place in a clear glass vase for a holiday festive natural decoration.  Closer to Christmas or if snow is on the ground, use colored holiday glass or plastic bulbs inter-spaced with sticks of cinnamon and star anise.  It will create a colorful and seasonal scent.

Seasonal Pomaders (oranges decorated with cloves) are a great seasonal decoration that only gets more fragrant as the season continues.

Choose a solid color - make the table all green or all red with a solid color runner, solid color Christmas bulbs in a bowl and an accent plate of the same solid color it makes whimsy without clutter.

One of my standbys is a poinsettia table cloth that was my grandmothers.  I then put a plain white runner down the center to remove clutter and accent with poinsettia flowers in bud vases.

Sometimes simple is perfect.  A pine or juniper branch in a clear champagne flute may be just the elegance your table likes.

Ideally, large parties should have more than one food location with different choices at each spot.  This motivates guests to move from place to place and thus circulate and socialize.

Join us again as we share more ideas for "Prepping for the Holiday" in the coming weeks.

Monday, December 17, 2012

Holiday Decorating with Pinecones

Recently Tina Sams, the editor of the Essential Herbal Magazine, was showing pictures of her chandelier decorated with pine cone ornaments.  I love pine cones as holiday decoration and have said on several occations that I want to decorate an entire tree with pine cones ornaments one year, but collecting only one or two a year, it will be sometime before I can fill an entire tree.

That got me to thinking.  I have made scented pine cones in the past and those are great ornaments.  How about making more brightly decorated pine cones?  Around my apartment complex are several different conifers giving a nice variety of cones.  I suspect you could try this too!

Collect cones from your yard.  It will get you outside for a walk and you can enjoy the season.  When you bring in the cones you must clean them.  Run them under cold running water and lay them out on a baking sheet covered with wax or parchment paper.  Place the tray in the oven at 250 degrees for 20 minutes.  This will open up the cones, remove excess sap, and kill any bugs or bacteria hiding inside.

Let them cool.  You will see re-crystalization of some of the sap which gives the cones a natural beauty, then get creative.

You can scent the cones with a mixture of ground spices (see this previous post) or you can decorate them for use in displays.  Here are a few suggestions for decorating pine cones.

  1. Paint the tips of the pine cone wings. (Yes, that is what they are called!) With white poster paint paint just the tips of the wings to look like snow, then sprinkle with clear or white glitter or even granulated sugar for sparkle.
  2. Spray the cones with clear acrylic or paint them with clear glue and tumble in a zip lock bag filled with colored glitter.  You can use one color at a time, like red, green, silver or gold on blend the glitter together for a combination effect.
  3. Dot the cones with craft glue and press on colored sequins.
  4. Wedge fun spices and herb twigs in between the wings, like juniper berries, allspice berries, star anise, broken cinnamon sticks, and cloves.  This is a rustic natural look that will also give off a scent.
  5. Dip the cones in wax and use to decorate the mantle, then use them as fire starters for a Christmas night blaze.
  6. For a crystal effect, paint on some clear glue then roll the cones in faceted or smooth glass seed beads.

Tuesday, December 21, 2010

Holiday Decorating Occasional Series 5 of 5 -- Yule Logs

Yule is an old name for the Winter Solstice.  It falls between the 20th and 23rd of December and signals the true beginning of winter.  It occurs on the longest night of the year when darkness overcomes daylight.  And traditionally as the sun’s arc stays close to the horizon most of December, many of the days seem darker.  This darkness is a perfect time for people to slow down, take stock of their situation and enjoy quiet moments with family.

Celebrating the Winter Solstice is something that I and my friends have done for years.  Once or twice we ended a rather unpleasant year by placing our worries, concerns and sadness on slips of paper and burning them in a great fire.  Thus relieved, we could begin the New Year with all its promise.

A Yule celebration, especially as gardeners, reminds us the promise of life that is hidden in this wintertime of slumber.

This is the last in a set of five postings I have done on decorating and using herbs for the holidays.  In my final Holiday Decorating post I thought I would give you instructions for two different Yule Logs, one to burn and one to eat. (If you want to see the others on scented dough, decorating tips, using cranberries and scented items, and the extra on herbal cookies, click these links or search the blog under Christmas or Holiday.)

Make a Yule Log to Burn

Yule logs are a tradition for the winter solstice, to bring light to the longest night of the year.  They have become a Christmas tradition in many areas as the holidays are so close together.

You need a nice sized fireplace log
A bag or two of oak moss (hobby store)
Some thinned white glue
A variety of spices, dried sprigs of herbs, pine boughs, and cones
Some paper ribbon for a bow
Raffia or twine

Cover the log with oak moss using thinned white glue (do not use hot glue – it is flammable.) Tie pine boughs and cones to the log.  Decorate your log with spices and herb branches.  Nutmeg and cinnamon release a wonderful scent when burned.  As a final touch add a burnable paper bow.  To burn the log place it over hot coals which will allow it to catch fire slowly and burn brightly.

Alternative Yule Log to Eat

Rather than create a log to burn, you can make this one to eat!  Share it with friends during your Holiday celebrations.

8 oz. cottage or cream cheese
8 oz. grated cheddar cheese
2 tsp. chili powder
¼ tsp. each thyme and rosemary
1 tsp. each garlic powder and minced onion
½ cup chopped nuts
salt & pepper to taste
paprika

Blend together cheeses.  Add herbs and seasonings (except paprika).  Form into two rolls and sprinkle with paprika and nuts to give a bark effects.  Chill.  Slice thin and serve on crackers. 

May your Holiday Celebrations be joyous and merry!
Stop back tomorrow for the Herb of the Week, horseradish the 2011 herb of the year.

Wednesday, December 15, 2010

Herb of the Week - Mistletoe

North American mistletoe (Phoradendron tomentosum) does not belong to the same genus as the European mistletoe, but the legends and lore of the European plant long ago made their way to America.  In fact, this evergreen herb that seems to miraculously grow in trees has spread its magic across many different cultures.  You cannot cook or make medicines with mistletoe but the customs that surround it are interesting to share.

So this week's HERB-OF-THE-WEEK is Mistletoe!


Mistletoe is the common name for a group of semi-parasitic plants in the order of Santales that grow attached to and within the branches of a tree or shrub. The name was originally applied to Viscum album (European Mistletoe), the only species native in much of Europe. Later the name was further extended to other related species, including  Phoradendron serotinum (the Eastern Mistletoe of eastern North America).  European mistletoe is readily recognized by its smooth-edged oval evergreen leaves born in pairs along the woody stem, and waxy white berries in dense clusters of 2 to 6. In America, the Eastern Mistletoe is similar, but has shorter, broader leaves and longer clusters of 10 or more berries.
Viscum album is a poisonous plant that causes acute gastrointestinal problems including stomach pain, although it has a history of increasing sex drive and curing forms of cancer it is not considered a plant to eat or use to treat any ills.
The Name & Symbolism
The word 'mistletoe' (Old English mistiltan) is of uncertain etymology; it may be related to German Mist, for dung and Tang for branch, since mistletoe can be spread in the feces of birds moving from tree to tree. However, Old English mistel was also used for basil.
So Washington Irving, in "Christmas Eve," relates the typical festivities surrounding the Twelve Days of Christmas, including kissing under the mistletoe (Washington Irving, The Sketch Book of Geoffrey Crayon, Gent). Irving continues his Christmas passage with a footnote:
"The mistletoe is still hung up in farm-houses and kitchens at Christmas, and the young men have the privilege of kissing the girls under it, plucking each time a berry from the bush. When the berries are all plucked the privilege ceases."
We more recent users of Mistletoe have conveniently forgotten the part about plucking the berries (which, incidentally, are poisonous), and then desisting from kissing under the mistletoe when the berries run out!
Along with Christmas Holly, bay laurel, rosemary, yews, boxwood bushes and of course, the Christmas Tree, mistletoe is an evergreen displayed during the Christmas season and symbolic of the eventual rebirth of vegetation that will occur in spring.
Kissing under the Mistletoe
Most people do not even realize that mistletoe does not grow on the ground, but rather on trees as a parasitic shrub. As such it tends to grow high off the ground in among the branches of other trees (making easier to pass UNDER!)  That's right: as unromantic as it sounds, kissing under the mistletoe means embracing under a parasite....
The variety common in Europe was imbued with religious significance by its ancient denizens. We find the source of "kissing under the mistletoe" in Celtic rituals and Norse mythology. In Gaul, the land of the Celts, for instance, the Druids considered it a sacred plant. It was believed to have medicinal qualities and mysterious supernatural powers.
Baldur, the Norse God of living plants, is believed to be the key to the history of mistletoe as a "kissing" plant.
Baldur's mother was the Norse goddess, Frigga. When Baldur was born, Frigga made each and every plant, animal and inanimate object promise not to harm Baldur. But Frigga overlooked the mistletoe plant -- and the mischievous god of the Norse myths, Loki, took advantage of this oversight. Ever the prankster, Loki tricked one of the other gods into killing Baldur with a spear fashioned from mistletoe. The demise of Baldur, a vegetation deity in the Norse myths, brought winter into the world, although the gods did eventually restore Baldur to life. After which Frigga pronounced the mistletoe sacred, ordering that from now on it should bring love rather than death into the world. Happily complying with Frigga's wishes, any two people passing under the plant from now on would celebrate Baldur's resurrection by kissing under the mistletoe.
May your holiday be filled with kisses!
Marcy Lautanen-Raleigh

Monday, November 22, 2010

Herbal Holiday Decorating Occasional Series (4 of 5)

This is the fourth in a series of blogs introducing you to ways of using herbs in your holiday.  We started with Scented Dough back in October, moved to a set of holiday recipes and gift ideas, detailed how to use cranberries for cooking and decorating and now I have a selection of scented items you can create at home, both for decorating and as gifts.

Rosemary Walnuts
I had to start with something edible, because tastes are always linked to the holidays.  This recipe is a twist on sugared nuts, giving you a savory recipe instead.
1 pound shelled walnuts
2 Tbls. of olive oil
2 Tbls. butter, melted
3 Tbls. minced fresh rosemary leaves
2 tsp. paprika
½ to 1 tsp.  salt or a salt substitute
Preheat oven to 325 degrees.  Place all ingredients in a bowl and toss to mix.  Spread on a baking sheet large enough to hold the nuts in a single layer.  Bake for 20 to 25 minutes, stirring once or twice or until the nuts are golden but not browned and the scent of rosemary fills the room.  Remove and cool.  May be eaten when warm or stored in an airtight container for up to 2 weeks.  Makes 2 cups.

Last night I found The Night the Grinch Stole Christmas on television, my husband, bless him, did not say a word about my watching it and sat silently on the couch as I recited all the lines over top of Boris Karloff and sang all the songs at the top of my lungs.  (The cats weren’t that generous!).  This movie is what I watch when I decorate my tree, it is a personal tradition started when I lived alone in Indianapolis after taking my first professional museum job back in… well never mind.  As soon as that show was on, I started thinking again about dragging out the decorations (I’d like to do it Friday, but Chas has other thoughts on this.  So instead, I decided I would make a few items to decorate with, as I make them I will put the up and it will be so gradual he won’t even notice!
Here is what I chose:
Scented Pine Cones
I will place a dozen or so in my trifle bowl and use it as a centerpiece.  They also look great stacked in a basket on the mantle.  From there you can even toss them into the fire for a crackle and scent.
      2 Tbls. orange peel
      1 1 /2 Tbls. orrris root
      1 Tbls. cinnamon pieces
      1 Tbls. Hibiscus flowers
      1 tsp. broken bay leaves
      10 drops cinnamon oil
      10 drops bergamot oil
      10 to 15 drops any other spice oils of your choice
      10 to 15 pine cones.
Mix together with pine cones in a zip lock bag shaking to cover.  Allow to meld as long as a week before using.

Herbal stars
Some woody herb branches have great scent, like sage, scented geraniums, and rosemary.  Strip the leaves off the stems trim them to length and bundle them together into a star shape with raffia or jute (4 sticks = 8 points).  You can also do this with cinnamon sticks.  I used scented geranium twigs for the pictures, but also made some with the rosemary I used to make the walnuts.

Hang Ornaments on Ribbon
I fill clear glass ornaments with pine needles, rosemary leaves, cinnamon chips and/or colorful herbs then hang them from ribbon in front of the window.  The window is large and faces the rising sun, so as the sun warms the bulb, it releases the scent.  It is marvelous to wake up to.  I saw once that someone put a wassail blend in ornaments this way. I am thinking about doing that this year, perhaps tonight!

Stove-top Simmers
Because of my husband’s aversion to evergreens, I try not to bring in too many, but I love the smell of pine.  As a substitute for that scent I will craft a spice mixture.  I find it a wonderful way to scent your home.  You can do it too.  Use commercial potpourri, or choose seasonal scents and make a simmer.  With a simmer you just set the herbs in a saucepan toward the back of the stove where the gentle heat will release the oils, or use an electric commercial potpourri pot or those with a candle underneath. 
To craft the simmer, combine herbs to equal about ½ cup dried herbs and add that to 2 cups water.
You can make your own blend with equal parts allspice, star anise, cinnamon sticks, gingerroot, whole cloves, and citrus peel.
You can add a few drops of essential oil to accent the aroma. This is where I get my pine scent from.  I use rosemary or pine oil in the simmer.   Keep an eye on the mixture to make sure all the water doesn’t simmer away or the herbs may burn (add more water as needed).

Orange Decorations
Yesterday I was in the grocery store and saw that the Clementines are in season.  These wonderful oranges are the ones used for making canned “Mandarin” oranges.
Oranges are a great holiday item and historic too.  Because of their scarcity they were always a special treat around the holidays and even used as part of gifts in the Victorian era.
 You can make a scented and colorful decoration using a few Clementines.  Just take Clementines and pierce them with wire adding several in a row to create a tower.  Then hang a bell or a bow at the end and hang it from your door knob.   It makes a unique decoration that welcomes guests with nice scent and unusual flair.
I hope you enjoy these scented additions to your holiday decorating and that you and your family have a Happy Thanksgiving!

As always you will find all our herbal products at http://www.backyardpatch.com/ !

Monday, November 8, 2010

Holiday Decorating Occasional Series, part 3 of 5 -- Cranberries

This season I wanted to share a few of my favorite herbie holiday ideas, which includes food and beverage recipes as well as decorating tips and gifts that use herbs.  This is Part 3 in an occasional Series of 5, to read part 1 on Herb Scented Dough, click here or part 2 on Holiday Decorating & gift ideas click here.

This time I wanted to focus on an important seasonal plant, so you could learn its benefits and uses—Cranberries.  When my husband worked at Kline Creek Farm there were several occasions when I strung popcorn and cranberries for tree decorations.  As a result of staining my fingers with berry juice, I learned to enjoy the aroma, color and flavor of these great berries.

The health benefit of cranberries has become more widely recognized over the past two decades.  In addition to preventing urinary tract infections and kidney stones they have also been found to fight plaque build up on teeth that cause gingivitis and gum disease.  So in addition to drinking a 100% cranberry juice, here are a couple recipes to try with the berries.

Cranberry Cordial
Now is just the time to start making this for the end of December or Thanksgiving Holidays.  It is one of my favorite ways to use Scented Geranium leaves too!

1 pound fresh or frozen cranberries, chopped
3 cups sugar
3 cups light rum
2 sprig rosemary
3 rose geranium leaves

Combine cranberries, sugar, and rum.  Place in a clean jar with rosemary and rose geranium leaves.  Cover and place in a cool dark place, shaking every few days.  After 4 weeks, strain the liquid bottle and serve.  Save the strained cranberries in nut breads, cooking compotes, chicken salad or over ice cream.

Spiced Cranberry Orange sauce
You can serve this over turkey, it is zingy and special.

1 pound fresh cranberries, rinsed and picked through
¾ cup sugar
Juice and zest of 1 large orange (leave zest in large pieces)
½ tsp. ground ginger
¼ tsp. nutmeg
4 cloves, stuck into a section of orange rind for easy removal
1 3-inch cinnamon stick, broken
½ cup light red wine

Combine ingredients in a large saucepan.  Bring to a boil; reduce heat and simmer for about 10 minutes, stirring occasionally until cranberries pop and sauce thickens.  Remove from heat and let cool.  Remove cinnamon, cloves and zest.  Pour sauce into a bowl and chill.  Serves 10.  Can be made a day ahead and refrigerated.

Cranberry Mint Ice Cubes
12 Individual berries
12 fresh mint leaves

Add 1 berry and 1 small mint leaf to ice cube compartments.  Add a small amount of water to each compartment.  Freeze.  When frozen add more water to encase the berry.   Add the cubes to iced water, ginger ale, tea, or even champagne!

Special EXTRA

Although you cannot eat this, it is fun to do.  And the colorful result can be added to even store bought potpourri to make it holiday festive.  Air-dry a cup of cranberries on a rack or spread them on a tray and place in a low oven (I turn the oven on to 200 degrees.  Once it is warmed I turn it off and place the tray inside with the door open.  I reheat as needed until the berries are dry.)  Once dried, you can add berries to your potpourri with some bay leaves.

Our next Blog in this series will be posted around Nov. 22, so stop back for part four.  And to view our seasonal gifts, baskets and wintertime products please stop by our website http://www.backyardpatch.com/ which can direct you to other information and our e-stores.

All posted recipes are the copyright 2010 of Marcy Lautanen-Raleigh and cannot be used without permission.
Related Posts Plugin for WordPress, Blogger...