Now is the time to move plants
If you are considering moving any of your perennials or herbs now is
the time. They need at least 3 weeks to
reestablish good root growth and you want that to occur before any signs of
frost so August is the month to do it. I
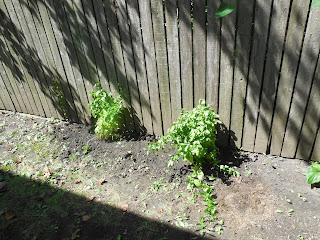
moved 8 plants from the community garden to the new back yard last fall and all
of them thrived this spring except one (the lemon balm died?!?).
This was when we moved and I prepped the bed and moved my plants at the
end of August beginning of September so they would be hardy enough to make it
through the winter. As you can see they are much larger than the plants I put
into the garden this spring, so that establishment of worked well.
 |
| July 2016 |
There are many reasons for moving a plant. It may have outgrown its
location. It may need more or less sun than it receives in its current
location. It is overtaking plants around it.
Or even it looks out of place with the others near it. Whatever the reason, the degree of difficulty
depends on the size of the plant. The
mint plants here are crowding out each other and cross pollinating, so they
have to be separated. That is the task I
am undertaking.
 |
| Mints obscuring the flamingos! |
How to Move A Plant
For small plants, such as annuals, it’s just a matter of using a garden
trowel to dig around the root ball and gently raising the plant (with root ball
intact) out of its hole. For a larger plant, especially a well rooted
perennial, you will need a shovel to dig around the plant and get deep enough
to extract the root ball without leaving too much behind. That cutting and tearing of the roots causes
root shock and will set the plant back, which is why you need 3 weeks of good
weather to help it recover before bad weather sets in. Make sure you have already dug the hole for
the new location, and used some of the soil from its current location to fill
in the new hole. It’s a shock to the plant’s root system when transplanted, so
the new hole should have “familiar” soil.


Step #1 – Prepare the New Hole
Dig out the soil where you want to plant. Make the hole 1.5 to 2 times bigger than what
you expect to place in the hole. If the
ground is hard, such as clay soil, you might want to dig out 3 times the size to
give the plant more room to spread in future by loosening the soil now when
there is no plant to work around.

Then make a “new” soil, by combining what you remove with a top grade
composted soil and some organic mater, leaf mold from the compost bin is great
or you can use peat moss. This time of
year I have lots of leaf mold from last year’s leaf raking. Refill the hole half way, to the expected
right size for the transplant, and add some of the “old” soil to the bottom of
the hole.


Step # 2 – Dig Up the Plant and Place in the New Hole
Using your sharp shovel (in other words, not a blunt end hovel like one
you’d use for edging) dig down into the soil around your plant all the way
around. Do not yank or pull on the
plant, just dig all the way around.
Place the shovel point underneath once the soil is loosened and pop out
the root ball, you may have to cut through roots so be prepared.


Lift the plant from the bottom of the root ball and gently place it in
the new hole. If the neck of the plant is level with the ground, fill the hole
with the remaining soil mixture. If the neck of the plant is not level with the
ground, adjust by removing soil or adding soil. Once the hole is filled in with
the soil mixture, immediately apply water.
The second plant, to go against the fence, turned out to be much larger than I realized. It was heavy and hard to lift and the ball was twice the size of the hole I dug. I set the plant on the ground and dug another hole and then divided the root ball in half. The roots were so thick I needed to cut them with garden shears to create two plants. This can increase the shock to the plant so I carefully watered them a couple times that day and the next.

The second plant, to go against the fence, turned out to be much larger than I realized. It was heavy and hard to lift and the ball was twice the size of the hole I dug. I set the plant on the ground and dug another hole and then divided the root ball in half. The roots were so thick I needed to cut them with garden shears to create two plants. This can increase the shock to the plant so I carefully watered them a couple times that day and the next.

I generally place water in the hole before I bring over the plant and
then again after I plant the plant and firm up the soil. If the soil sinks around the plant be sure to
add more. You do not want roots exposed
to the drying sun. Apply water everyday
for a week, so that the roots regenerate. After one week, apply an organic
fertilizer or water with compost tea.
Step #3 – Observe Plant for Signs of Stress
The plant will experience stress after being transplanted. Signs of
stress may include droopy leaves, yellowing leaves, dry leaves, and pale
stem/branches. Insects and pests like to attack a plant when it’s stressed, so
beware. Keep an eye on the plant to make sure it recovers and begins to thrive.
About 3 weeks after transplanting, the plant should have resumed its normal
appearance.

I find mints get very droopy
but only for a few days. If it persists
longer, I start looking for causes and may add more of the native original soil
around the plant or water less or more frequently depending on the feel of the
soil. If the soil is dry and crumbly I
add more water and if it is soft and spongy I use less to allow it to dry
out. Remember that plants breathe through
roots so a saturated soil can suffocate them.
 |

It rained for days after the transplant so the plants were very happy and so were the weeds!

No comments:
Post a Comment